To begin with, you must have the proper items to work with. Those items being:
1. GIMP
2. Image(s)
3. Font(s)
GIMP is great, but has a limited supply of fonts. If you want a different font than one offered in GIMP, you must find one, download it, and install it into GIMP. You must locate the directory that GIMP uses for fonts. To find that directory you must open GIMP. Click on 'File' and 'Preferences'.
 This will bring up the 'Preferences' box. In the left column click on 'Folder' then 'Fonts'. A Fonts Folder box will open up and show the directory that GIMP will search for fonts.
 Now that you know where GIMP looks for fonts...put some in there. I opened up the directory in Windows Explorer and dragged and dropped my font files. Simple. Restart GIMP and your new fonts will be available.
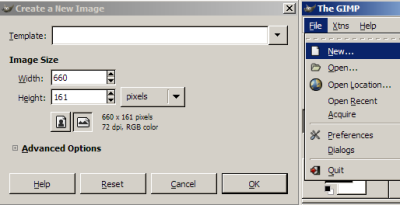
Now we can get down to business. Since we are making a header, we need to know the size. Click 'File' and 'New' to open up the 'Create a New Image' box. For this tutorial I'm using 593 x 159 pixels so that it will fit in my blog post. The size of the header on my blog now is 660 x 161. Put your sizes in the 'width' and 'height' boxes.
 Click 'OK'. A new blank screen will popup. That is our drawing board.
At this point I clear my desktop except for the images I want to use just for ease of working. First we'll add the images to the drawing board by right clicking on the image and dragging and dropping it in the box.
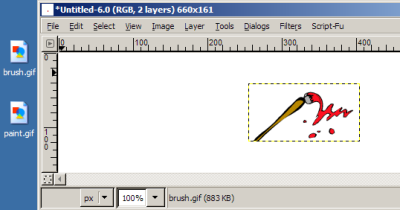 It will land right in the middle. So, unless you want it there, it has to be moved. Go back to the main GIMP application and click on the little crossed arrows. Then move your cursor on the edge of the dotted line of the image and move it where you want.
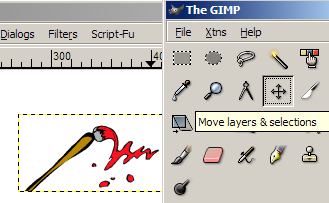
When you are happy with image placement, it is time to add the title and any description you want. (Remember, you can always move the images and lettering layers later if you need to.) On the main GIMP application click the 'T' and select your font from the drop down list below. You can change the size of the text and color in the field below.
 Click approximately where you would like the lettering to begin in the drawing board area and a small popup window will appear.
 That is where you type in the text. If things aren't lined up properly, click on the crossed arrows and drag the 'layer' where ever you want.
Now, save your header by clicking 'File' and 'Save As'. Give it a name and file extension. (I've been using PNG.) It may say something about export...just let GIMP have it's way and export and if it says anything else, agree again and click 'OK'. Then everyone is happy.
Here is the result of my practice header.

If you need a little help getting that header into your blog, you may want to look at these posts The GIMP: new custom header and The GIMP: new custom header (Part 2).
I think I covered everything needed to make a simple header/banner using GIMP. Experiment with it! Here is a tutorial for GIMP with more indepth instructions on it's use. If by chance you use my tutorial to make a header for your blog, leave a comment with a link! I would love to take a look.
No comments:
Post a Comment