Tuesday, 31 October 2006

Peek-A-Boo Blogger Navabar

If you ever wished you could do something with the navabar, but didn't really want to eleminate it altogether, I think Avatar has a solution for you. Look at his post Blogger v3.0: Hovering Peek-A-Boo Blogger Navbar for simple to follow instructions. He even has visual aides!!! You put a couple of lines of code:
#navbar-iframe{opacity:0.0;filter:alpha(Opacity=0)}
#navbar-iframe:hover{opacity:1.0;filter:alpha(Opacity=100, FinishedOpacity=100)}
between <head> and </head> and before the beginning of the CSS section. Like I said, he has nice pictures that show exactly where to put it.

After it is in place, when you hoover your cursor over where the navabar should be, it will appear. Magic!!

post signature

Sunday, 15 October 2006

Table of Contents - another method

In this post, A del.icio.us way to make a previous post list, I explained how to add a Table of Contents to your blog. The method used del.icio.us as it's backbone. And it works well, especially for those that haven't switched to Blogger Beta. Well, I have switched, and it doesn't work quiet as seamlessly as before. I have to go through a few more steps.

Hans, from Beautiful Beta, has figured out a different, more streamlined, method of making a Table of Contents. I'm going to detail it here, because unless you are very familiar with beta, you may be lost.

First open your dashboard and go to Template/Edit HTML. Check the box to 'Expand Widget Templates'. Scroll down until you find:
<b:includable id='main' var='top'>
<!-- posts -->
<div class='blog-posts'>
<b:loop values='data:posts' var='post'>
<b:if cond='data:post.dateHeader'>
<h2 class='date-header'><data:post.dateHeader/></h2>
</b:if>
<b:include data='post' name='post'/>
<b:if cond='data:blog.pageType == "item"'>
<b:if cond='data:post.allowComments'>
<b:include data='post' name='comments'/>
</b:if>
</b:if>
</b:loop>
</div>

<!-- navigation -->
<b:include name='nextprev'/>

<!-- feed links -->
<b:include name='feedLinks'/>
</b:includable>
Replace with:
<b:includable id='main' var='top'>
<!-- posts -->
<div class='blog-posts'>
<!-- on a label page, add a header saying 'Contents' -->
<b:if cond='data:blog.homepageUrl != data:blog.url'>
<b:if cond='data:blog.pageType != "item"'>
<b:if cond='data:blog.pageType != "archive"'>
<h2 class='date-header'>Contents</h2>
</b:if>
</b:if>
</b:if>
<!-- Start loop for displaying posts here -->
<b:loop values='data:posts' var='post'>
<!-- Date-headers are only displayed if on main, item or archive page -->
<!-- If on label-page, then no date-header -->
<b:if cond='data:blog.homepageUrl == data:blog.url'>
<b:if cond='data:post.dateHeader'>
<h2 class='date-header'><data:post.dateHeader/></h2>
</b:if>
<b:else/>
<b:if cond='data:blog.pageType == "item"'>
<b:if cond='data:post.dateHeader'>
<h2 class='date-header'><data:post.dateHeader/></h2>
</b:if>
<b:else/>
<b:if cond='data:blog.pageType == "archive"'>
<b:if cond='data:post.dateHeader'>
<h2 class='date-header'><data:post.dateHeader/></h2>
</b:if>
</b:if>
</b:if>
</b:if>
<!-- Here we start displaying the posts. -->
<!-- If we are on a label page, only the posttitle is displayed -->
<!-- On other pages the entire post is displayed -->
<b:if cond='data:blog.homepageUrl != data:blog.url'>
<b:if cond='data:blog.pageType != "item"'>
<b:if cond='data:blog.pageType != "archive"'>
<a expr:href='data:post.url'><data:post.title/></a><br/>
<b:else/>
<b:include data='post' name='post'/>
</b:if>
<b:else/>
<b:include data='post' name='post'/>
</b:if>
<b:else/>
<b:include data='post' name='post'/>
</b:if>
<!-- If on item page display comments -->
<b:if cond='data:blog.pageType == "item"'>
<b:if cond='data:post.allowComments'>
<b:include data='post' name='comments'/>
</b:if>
</b:if>
</b:loop>
</div>

<!-- navigation -->
<b:include name='nextprev'/>

<!-- feed links -->
<b:include name='feedLinks'/>
</b:includable>
That is the first part of the process. The second part involves putting a link in your sidebar. In Blogger Beta, open Dashboard/Template/Page Elements, then open 'Add a Page Element'. Select the 'Link List' widget. Give your widget a title in the top box, and name your link in the bottom box. (Something like Content, or Post List.) In the 'New Site URL' add this link:
http://yourblogURL/search/label/?max-results=999
Make sure you replace yourblogURL with your URL. And that is it. All except for visiting Hans and thanking him for such a wonderful hack!!

post signature

Friday, 13 October 2006

RMail - Subscribe by Email to Any RSS Feed

I just found out about a new (to me) method of allowing readers to subscribe to my blog by email through John's post E-Mail for Feedreading. It is called RMail. Apparently it is a popular method of using a feed. A whopping 44% of his subscribers use RMail!

RMail has over 25,000 users, 65,000 subscriptions and they are sending over 50,000 emails per day according to Randy Charles Morin, President and Founder of RMail. Randy found a need and filled it. You can read more about the daily in's and out's at R|Mail Blog.

I have only recently started looking more seriously into RSS feeds. I didn't think I had a need for one because I enjoy going to each blog and reading the posts. But, for me, the advantage of a feed is I can visit a blog when I see it updates. It truly saves much time.

I have added a RMail subscription widget in my sidebar in the 'My RSS Feed' section. Give it a try!

post signature

Thursday, 5 October 2006

My new obsession...Ma.gnolia - Social Bookmarking

Roots connects you with the Ma.gnolia community as you browse the web. It's an idea that's profoundly simple and pleasing to the eye: while you're looking at a website, click the Roots bookmarklet and see what the Ma.gnolia community thinks of that site.

First, we should discuss social bookmarking. What is it and why should you look into it? Social bookmarking is a means to keep your collection of bookmarks on the web versus only on your home computer. The benefits of this are immediately obvious. No matter where you go, or what computer you are on, you have access to your bookmarks. Good, yes? Here is where the social part enters...you can share all your bookmarks and see what others find worth saving!

Ma.gnolia is a relatively new social bookmarking tool. It made it's formal debut February 2006. But, don't dismiss it because it is the new guy on the block. You might wonder why I like Ma.gnolia so much more than the others (which are awesome in their own right). The others being technorati and del.icio.us. I use them all, but I tend to use technorati and del.icio.us for blog business, and use Ma.gnolia for more personal use. It just unfolded that way. Some things just take a natural course. Like a river. (Excuse that last phrase...Ma.gnolia brings out the Zen in me.)

For me, the advantages of Ma.gnolia is the fact that it stores a picture of your bookmarked website, so even if it goes offline, you can still view the information. Another thing. Ma.gnolia takes the social part a step further. It features groups that you can join or you can start your own group. Maybe you just want to have a discussion about a website. No problem. It also features something called Ma.gnolia Roots. You can see it in action on my sidebar.Very social. And the Ma.gnolia website is a design masterpiece. I like the look of it...simple, clean, easy. Not the utilitarian look of del.icio.us and not as complicated as Technorati.

But, how do you keep track of all your bookmarks? There are no folders. That is right. No Folders. Social bookmarking uses a concept that makes categorizing by folders obsolete. It is a little something called a tag. (Blogger had to be different and called their tags labels. But, we know what they are.) Let me explain the advantages. Let's say you are into graphics and recipes. You want to bookmark a website you found called Slashfood - Food Porn. Before, you would have to choose what folder to put it in...recipes or graphics. With social bookmarking, you 'tag' each site with words. In this case you could use both recipes and graphics. Then anytime you returned to Ma.gnolia and did a search for recipes, that site would be listed with all the others you tagged 'recipes'.

By the way, did I mention it was pretty....

UPDATE: the Roots icon is no longer in my sidebar

post signature

Social Bookmarking...so Web 2.0!!!

Social bookmarking sites are an increasingly popular way to locate, classify, rank, and share resources through tagging.

I couldn't resist. Hans over at Beautiful Beta has been burning the midnight oil coming up with new and beautiful ways to adorn a blog. One of his latest is Social Bookmarking. Everyone has a favorite (my newest fav is Ma.gnolia, but that is another post). When I get time to work with the bowels of my template, I'm going to edit his code a bit. But for now, it is up and running, at the bottom of my posts. And looking quite spiffy.

Once again I am thanking Hans for all his hard work. And helping to make my blog soooo Web2.0!!!!

post signature

Tuesday, 3 October 2006

Recent comments

Finally it is ready for use! I'm talking about recent comments. I have tried for ages with various hacks, but none ever quite worked for me. *sigh* But, now I have it, and I'm happy. Check it out!

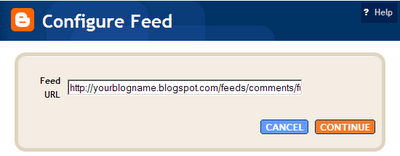
If you would like to display comments in your blog, first you must have Blogger Beta. Then go to page elements/add a page element/feed. Put this in the first box:
http://yourblogname.blogspot.com/feeds/comments/full
Make sure you replace yourblogname in the URL with your own, click continue. Then in the next window, you are able to select a few options. I named mine "Recent Chit-Chat", keep the comments to 5, and choose to have the comment author listed.

When it is done, move/drag it to the area on your sidebar you want to see it, and it is go to go!

Waiting for that first comment to show up...waiting...waiting....

post signature