Showing posts with label Comments. Show all posts

Saturday, 5 September 2009

Change comment script from plural to singular


Things that drive me crazy...I hate it when I look at a blog and it says "1 comments". I had a fix for classic blogger, but just realized that I didn't have one for the the new blogger. So, if it drives you crazy too, roll up your sleeves and dive in. But first...always first...backup your template! This fix requires you to go deep within the bowels of you template. GASP...the dreaded Expand Widget Templates. So, expand them and let's go!

First find this code in your blog. I'm basing this on the Minima template, so your code may be slightly different.

Step 1 Find this code:
<b:if cond='data:post.numComments == 1'>1 <data:top.commentLabel/><b:else/><data:post.numComments/> <data:top.commentLabelPlural/></b:if>


Step 2 Replace that with this code:
<br /> <b:if cond='data:post.numComments == 1'>1 comment<br /> <b:else/><br /> <b:if cond='data:post.numComments == 0'>Reply to this post<br /> <b:else/><br /> <data:post.numComments/> comments<br /> </b:if><br /> </b:if> <br />


Step 3
Repeat Step 1 and 2 because this code is in your template twice.

Now you can get a little fancy and instead of where it says Reply to this post, you can put whatever you want. Like...Let's talk...Be the first to comment...Don't leave me hanging.

Now your blog is approved by the Emily Post Institute of Etiquette. Well. Maybe not. It depends what else you put in your blog. But at least she is smiling over your comment grammar.


post signature

Sunday, 29 June 2008

Inline Comments for Blogger!!!

Oh, happy days!! Blogger, in it's infinite wisdom, has decided to give us inline comments!!! I have waited and waited. Tried hack after hack, but couldn't get any to work. Now it is there for the clicking!

If you have a straightforward template the change is extremely simple. You must got to the Blogger in Draft dashboard. Go to Settings | Comments | Comment Form Placement. Then select Embedded below post. Save and that is it.

For those of us that have done extensive customization to the template, there are a few more steps. First, follow the above instructions. Then do a quick check on a post page and see if the inline comment form is in place. If not, this is what I had to do to my template. Remember each template is different, and it may take some trial and error. Save your template before beginning.Go to your Dashboard | Layout | Edit HTML | Expand Widget Templates. The key word I looked for to get me where I needed was comment-footer.

Side note: did you know that in Firefox you can go to Edit | Find in This Page... That will open a little bar at the bottom of the window. Type in the word you want to search for. In this instance, I typed in comment-footer. Then click next. Each time you click it, you will be taken to the next instance of that word or phrase in the page!!

Find:

<p class='comment-footer'> <a expr:href='data:post.addCommentUrl' expr:onclick='data:post.addCommentOnclick'>Post a Comment</a> </p>

Change to:

<p class='comment-footer'><b:if cond='data:post.embedCommentForm'> <b:include data='post' name='comment-form'/> <b:else/><a expr:href='data:post.addCommentUrl' expr:onclick='data:post.addCommentOnclick'>Post a Comment</a></b:if> </p>

Your template may be tweaked differently. Basically, this is the line of code I had to add which made the inline comment form appear:

<b:if cond='data:post.embedCommentForm'> <b:include data='post' name='comment-form'/> <b:else/></b:if>

Now commenting has been taken to a whole new level on BlogU and blogs across the world! It is quick and simple for readers to leave a comment without leaving the page.

post signature

Saturday, 15 December 2007

The Scoop on OpenID and Blogger Comments

I have been looking into OpenId and it's connection with Blogger. I went straight to the source, thanks to Janeywan for sending me the link to OpenID Commenting on Blogger Buzz.

If you haven't set up OpenID, you can still link to your blog — or any webpage, for that matter — by using the standard tag inside the comment form.

From Blogger Buzz
First, what does OpenID do? It allows you to take your identity with you, proving that you own a particular URL. Isn't that simple? Yes. And a big surprise is that you may already have an OpenID. If not, don't fret. There are several options to get one:
  1. myOpenID which is what I used.
  2. claimID
  3. myvidoop
  4. myID.net
  5. VeriSign Labs
What does it mean to you, a blog owner? It means that readers can leave authenticated comments on your blog using their blog URLs from OpenID-enabled services such as WordPress.com, LiveJournal, and AOL Journals, or with their AOL/AIM accounts. When they leave a comment with an OpenID , you will see this icon OpenID icon next to their names. No more comment spoofing.

To enable this on your blog, go to your Dashboard | Settings | Comments | Who can Comment | check Anyone or Registered Users.

This is from myOpenID on using your own URL:

You can use your own URL as your OpenID, and still use myOpenID as your OpenID server. To set this up, create an account, and add the following markup into your page's <head<> section:
<link rel="openid.server"
href="http://www.myopenid.com/server" />
<link rel="openid.delegate"
href="http://youraccount.myopenid.com/" />
<link rel="openid2.local_id"
href="http://youraccount.myopenid.com" />
<link rel="openid2.provider"
href="http://www.myopenid.com/server" />
<meta http-equiv="X-XRDS-Location"
content="http://www.myopenid.com/xrds?username=youraccount.myopenid.com" />
Or another method...which I decided to use:
<link href='http://www.myopenid.com/server' rel='openid.server'/> <!-- For delegating OpenID v1.x-->
<link href='http://youraccount.myopenid.com' rel='openid.delegate'/> <!-- For delegating OpenID v1.x-->
<meta content='http://youraccount.myopenid.com/xrds' http-equiv='X-XRDS-Location'/> <!-- For delegating OpenID v2.x-->;
In both examples put your OpenID username where it says your account.

That's it. You can now use your own URL to log into OpenID enabled sites with myOpenID as your OpenID server.

Now, while I have your attention. Big Bad Blogger apologized for removing the URL field from the comments form prematurely. And they regreted making it appear that they were trying to force you into getting a Google Account. Don't you all feel bad for talking the way you did about them? Shame on you.

post signature

Friday, 14 December 2007

The Blogger openID debate

There seems to be a huge rumbling about Blogger these days. A revolution of sorts. I'm not jumping on that band wagon. It concerns comment links and openID.

Let me step out on a limb here and say that I didn't start blogging to become the most popular kid on the block. I started blogging because I felt I had something to share with others. Nor do I comment only to have a link back to my blog. I comment because I have something to say. Either to let the poster know that I appreciate a well written post, or I have something that could be of interest to that poster and their readers. I didn't choose a blogging platform for it's ability to allow links in it's comment section.

With that being said, I do think linking is important. But not for the reason you may think. I like following links and placing links for the information shared within that link.

I will do what I always do with Blogger. Find a way. Just to make it simple for my readers, I have put this in the Comment Form Message in the comment setting section of the dashboard. Now my readers may comment and leave a link to something of interest. Or, if they wish, they can leave a link to their blog. Either way, it is there and easy to use.

I'm playing around with some of the fixes I've found, but at this point I'm not entirely clear on what I'm fixing! It all seems to work fine.

I really don't see what the fuss is about. Blogger will get it together and we will live happily ever after in Blogger Land.

post signature

Saturday, 10 November 2007

New Comment Feature in Blogger

I've been so busy, but I wanted to point out to those of you that haven't noticed the new comment feature feature that recently appeared in Blogger.

After leaving a comment, you will see a new choice Email follow-up comments to. There you are able to choose to have any follow-up comments sent to you.


I love this feature, being a long time advocate of any means to tell readers when a comment is left. One of Blogger's better moves. Comments are the backbone of blogs. And email follow-up comments is calcium. (Is that goofy or what??)

post signature

Wednesday, 24 October 2007

Change "Post A Comment On:" Text


Hi, I've been reading your blog for a few weeks now and I've gone way back into your archive. It's been a huge help for me. Thank you! I am writing however because I can't figure out how to edit the "Post A Comment On:" page. See this link for my specific example.

I've been creating a wedding website based on Blogger and have only allowed comments on the Guestbook "page" of my site and I've changed all references to "comments" to read "entries" or "guestbook entries" or "sign my guestbook". The only exception is this page which I can't quite figure out how to modify. Do you have anysugestions. The wedding site is: www.florandbrian.com
Thanks,
Brian


Brian, first you must open your dashboard | Template | Edit HTML and check Expand Widget Templates. Search until you find this code in the template:
<p class='comment-footer'>
<a expr:href='data:post.addCommentUrl' expr:onclick='data:post.addCommentOnclick'><data:postCommentMsg/></a>
</p>
Change the code in red to the code in green:
<p class='comment-footer'>
<a expr:href='data:post.addCommentUrl' expr:onclick='data:post.addCommentOnclick'>Sign my Guestbook</a>
</p>
That should do it! And congratulations to you and Flor!!

post signature

Monday, 10 September 2007

Comment Feed Tutorial

Now that I have completed RSS in simple terms, which explains the basics of RSS, and Setting up a RSS Feed, which explains how to open a feed for posts, I can dig a little deeper. For me, setting up a comment feed was extremely difficult. I don't know exactly why that is. Maybe because ages ago I removed some code from my template that had to do with comment feeds, or I just couldn't figure out where or what my comment feed was. I worked entirely too long on this problem. Some things are not meant to come easy to me, but when they do I wonder what took so long for the light to come on. As you can see, the light did come on, and I have a shiny new comment feed in my sidebar. I'm positive there are other ways to do this. But this is the only way I know, so let me explain it so no one else has to go through the darkness like I did.

I'm assuming you have read Setting up a RSS Feed, and it is humming along. Setting up a comment feed is a process, but once set up, it is an automatic thing of beauty. The process involves:
  1. MailBucket
  2. FeedBurner
  3. of course, Blogger
  4. Gmail
1. MailBucket. This is a service that provides an email-to-RSS gateway. What does this mean? In simple terms and more importantly - all that I need to know - is that it gives me a comment feed URL. To get this little snippet of magic code, go to the MailBucket site and read a bit about the service. Then in the address bar, type http://mailbucket.org/YOURNAME.xml. You will want to change YOURNAME to something relevant to your blog for ease of remembering. (And you will want this name for Step 4.) Then hit enter.
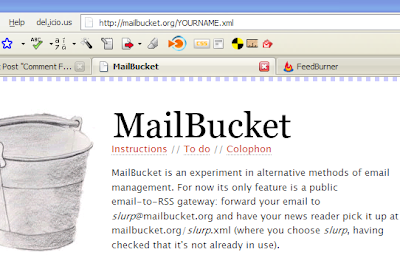

A little miracle occurs and your reader pops up! See the link ending in xml? Copy that. You will need it for your next step.
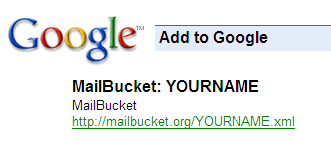


2. FeedBurner. Go to FeedBurner and sign in. Follow the steps in the previous post, Setting up a RSS Feed.



3. Blogger. When finished add the code to your blog...open Dashboard | Template | Page Elements | Add a Page Element | HTML/JavaScript. Paste that code in the window.

Now open Dashboard | Settings | Comments | Comment Notification Address. In this window paste your Gmail address. Remember to Save!

4. Gmail. Last stop. Open your Gmail account. We're going to work with filters. At the top of the window is a link that says Create a filter. You'll want to click on that.
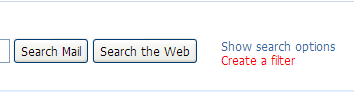


Next you'll see several boxes at top. We will only use the Subject area. Type in [YOUR BLOG NAME] New comment in that box. Then click Next Step>>.
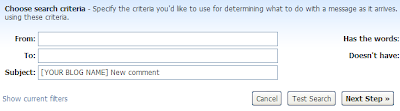


The next page you will check the Forward it to: box and then paste your MailBucket email address, which is YOURNAME@mailbucket.org. (Refer to Step 1 for the name you used with MailBucket.) Click on Create Filter.
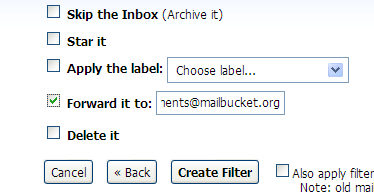


Now you are done. whew Yes, it is true. Get a glass of wine and set back to wait for a comment to roll in. Or pay your friends and family to leave a comment. Or comment yourself. (Which is what I did while testing...I'm impatient and cheap.) Somehow, don't ask me how, through the miracle of the internet, comments get forwarded to email and forwarded to MailBucket and sent to a feed. Then, if your readers are smart, they will subscribe to your comment feed and anytime someone leaves a comment (or in my case, I leave an answer to an important blogging question) they will see it in their reader!!!

post signature

Sunday, 26 August 2007

Pretty up the "Business End" of Your Post!

I just wanted something pretty in all that Posted by, Comments, Permalink jumble at the end of the posts. A tiny little image is just the thing.

Make or find a small image about 10x10px. Bullets work great for this purpose. Open the Dashboard | Template | Edit HTML.

Locate the CSS style sheet:
Classic Blogger: between the <head> and </head> tags
Blogger Beta: between <b:skin><![CDATA[/* and ]]></b:skin>
Find:
.comment-link {
margin-left:.6em;
}
And add two lines to make it look like this:
.comment-link {
margin-left:.6em;
background:url("URL TO YOUR IMAGE") no-repeat 0 .20em;
padding-left:13px;
}
Make sure to save your template. Now all your posts will have your very own little pretty image!!

EDIT: Thanks to the work of 16 Them All here is the additional code to make the image show on your Permalink page!!!

Same as before, locate the CSS style sheet:
Classic Blogger: between the <head> and </head> tags
Blogger Beta: between <b:skin><![CDATA[/* and ]]></b:skin>
Find this code (yours may look slightly different due to a different style):
#comments h4 {
margin:1em 0;
font-weight: bold;
line-height: 1.4em;
text-transform:uppercase;
letter-spacing:.2em;
color: $sidebarcolor;
}
and add two lines to it to make it look like this:
#comments h4 {
margin:1em 0;
font-weight: bold;
line-height: 1.4em;
text-transform:uppercase;
letter-spacing:.2em;
color: $sidebarcolor;
background:url("URL TO YOUR IMAGE") no-repeat 0.05em;
padding-left: 18px;
}
Now the image is on your main page and permalink page!

post signature

Saturday, 18 August 2007

U Comment I Follow

OK, folks. Why didn't someone tell me there was a movement in the blogosphere? I get sidetracked with my move to Florida, and someone started a cause. I love a cause. Any reason to get on my soapbox.

Turn off “nofollow”. Show your commenters that you appreciate them.
Randa Clay Design

This one is worthwhile for all concerned. It involves link love and Google Juice. I've heard of link love, but Google Juice is a new one for me. Anyway, this movement allows comment links to be followed by search engines. Simply beautiful.

Originally, nofollow was created to stop comment spam. That didn't exactly work as planned. Spam still happens. And the only thing nofollow has stopped was link love.

Want to join the movement? First stop is Randa Clay Design to pick out your new badge. All good causes have a badge. This is no different. Here is the one I picked for my sidebar. Go on...pick out a purty one.

post signature


Next step is to remove the offending code from your template. Find the following code in your template and remove the code in red.

Blogger Beta (with widgets expanded):
<dl id='comments-block'>
<b:loop values='data:post.comments'var='comment'>
<dt class='comment-author'expr:id='"comment-" + data:comment.id'>
<a expr:name='"comment-" +data:comment.id'/>
<b:if cond='data:comment.authorUrl'>
<a expr:href='data:comment.authorUrl' rel='nofollow'><data:comment.author/></a>
<b:else/>
<data:comment.author/>
</b:if>
<data:commentPostedByMsg/>
</dt>

If spam still concerns you, enable comment moderation. Problem solved.

EDIT 08/24/07: It was drawn to my attention by a reader, Laila, that I removed too many >'s from the code. I corrected the code in Blogger Beta, so what you see now is correct. But, I couldn't find a way to remove it from Classic Blogger to my liking. In doing more research, I found this post that states:

"It is impossible, at this time, to remove NoFollow from Classic styled Blogger templates. This is due to the fact that those templates use the variable {$CommentAuthorName$} which encapsulates the anchor link around linking text."

Until I find a good solution, I am removing the portion of the post concerning Classic Blogger. Thanks, Laila, for making me look into it more!


post signature

Monday, 2 April 2007

Comment Reminder

...take advantage of email notification for new comments...

Sometimes you take something so much for granted and you forget that others may not be aware of it. I'm speaking of being notified via email when a reader leaves a comment on your blog. It would be impossible to check all my posts daily for new comments.

Luckily, blogger has come up with a simple built-in solution. To take advantage of email notification for new comments, open your Dashboard/ Settings/ Comments/ Comment Notification Address. In that box type the address you want the comment sent to. Easy, easy, easy...

post signature

Sunday, 25 February 2007

Recent Comments Widget Fix

I thought I could sit back and relax while Blogger fixed the recent comments problem of displaying older comments. I was oh so wrong. The search was on. I finally found a way to correct it while the Blogger folk sit back and continue relaxing.

First off, don't worry about it if you are not using Han's recent comment widget. But, if you are not, I would hurry on over there and get it. Anyway, the fix came from Anakbrunei.

Open your dashboard/ Template/ Page Elements. Then click on 'edit' in your recent comment page element. Look until you locate this little part in the text.
http://yourblog.blogspot.com
/feeds/comments/default
?start-index=2&alt=json-in-script
You will add the text in red. All is better now!

Update 3/5/07: Thanks to x_piove, there is a fix for the missing most recent comment. Change start-index=2 to start-index=1

post signature

Tuesday, 9 January 2007

Post a link in Comments

Have you ever been reading blogs and decided to comment? In writing your comment, you find that you need to post a link. Just how does one go about doing that? Well, it is fairly simple. This is the code you drop into the comment box:
<a href="URL">Title</a>
Replace the URL with the URL of the site you are linking to and replace the Title with the title of the site.

Easy as pie. Now get out there and comment!!!


post signature

Wednesday, 1 November 2006

Comment Notification and Author Comment Highlighting

I now have some hacks for the comments section - a hack to highlight your comments as the blog author and another to notify your readers when you respond to their comment.

I recently found a hack by Ramani over at Hackosphere. This is a two for one hack. This one really makes sense and is extremely helpful to all concerned.

It is helpful to the person posting a comment on someone else's blog because they will get an email notification when there is a response to that comment by the blog owner. How many times have you written a comment on a blog, and forgot about it or couldn't remember the blog you commented on?

It is helpful for the owner of a blog because many times a response to a comment is lengthy and involves research. Especially for blogs such as mine. Believe it or not, I read all comments and attempt to help all inquires for assistance. For me, it can be very time consuming. When I finally get the answer posted, I know that the person will be notified of my response.

As for the highlighting, it simply makes it easier to find the blog owner's comments in the list.

Read Ramani's instructions. If you need more explanation I'm outlining the steps below with a little more detail for how to:

In your style sheet find this:

.comment-body {
margin:0;
padding:0 0 0 20px;
}
.comment-body p {
font-size:100%;
margin:0 0 .2em 0;
}
and add this:
.comment-body-author {
margin:0;
padding:0 0 0 20px;
}
.comment-body-author p {
font-size:100%;
margin:0 0 .2em 0;
color:#CC3300;
text-decoration:bold;

}
This changes the blog owner's comment color and font type. The code in red is where you can change it from bold to normal or italics, and the color from this (which happens to be red) to whatever color you like.

Next open you template/edit HTML and check the little box above the editing window that says "Expand Widget Templates". Then look for:
<dl id="comments-block">
<b:loop var="comment" values="data:post.comments">
<dt class="comment-author" id="'">
<a name="'">
<b:if cond="data:comment.authorUrl">
</b:if></a><a href="data:comment.authorUrl" rel="nofollow"><data:comment.author></data:comment.author></a>
<b:else></b:else>
<data:comment.author></data:comment.author>
</dt></b:loop>
<data:commentpostedbymsg></data:commentpostedbymsg>

<dd class="comment-body">
<b:if cond="data:comment.isDeleted">
<span class="deleted-comment"><data:comment.body>
</data:comment.body></span>
<b:else></b:else>
</b:if><p><data:comment.body></data:comment.body></p>

</dd>
<dd class="comment-footer">
<span class="comment-timestamp">
<a title="comment permalink" href="http://beta.blogger.com/">
<data:comment.timestamp></data:comment.timestamp>
</a>
<b:include name="commentDeleteIcon" data="comment"></b:include>
</span>

</dd>

</dl>
and replace with this code:
<dl id="comments-block">
<b:loop var="comment" values="data:post.comments">
<dt class="comment-author" id="'">
<a name="'">
<b:if cond="data:comment.authorUrl">
</b:if></a><a href="data:comment.authorUrl" rel="nofollow"><data:comment.author></data:comment.author></a>
<b:else></b:else>
<data:comment.author></data:comment.author>
</dt></b:loop>
said...


<b:if cond="data:comment.author == data:post.author">
<dd class="comment-body-author">
<p><data:comment.body></data:comment.body></p>
</dd>
<b:else></b:else>

<dd class="comment-body">
<b:if cond="data:comment.isDeleted">
<span class="deleted-comment"><data:comment.body>
</data:comment.body></span>
<b:else></b:else>
</b:if><p><data:comment.body></data:comment.body></p>
</dd></b:if>

<dd class="comment-footer">

<span class="'">
<form action="http://www.anniyalogam.com/scripts/notify.php" method="post" target="_blank">
<input value="data:comment.authorUrl" name="profile" type="hidden">
<input value="data:post.author" name="nickname" type="hidden">
<input value="data:post.title" name="post_title" type="hidden">
<input value="data:post.url" name="post_link" type="hidden">
<input src="http://www.anniyalogam.com/1clickbutton.png" type="image">
</form>
</span>

<span class="comment-timestamp">
<a title="comment permalink" href="http://beta.blogger.com/">
<data:comment.timestamp></data:comment.timestamp>
</a>
<b:include name="commentDeleteIcon" data="comment"></b:include>
</span>
</dd>

</dl>
Now when you open a post page (that is the page that comes up when you click on a post title) you will see a little icon after each post. (Note, it does not show on the page where you actually type the post!) When you click on a person's post that you have responded to, an email will be sent to them saying a response has been posted to their comment. This only works if the commentor has enabled "Show my Email Address" in their 'User Profile'.

I love this hack! I only wish more bloggers would enable "Show my Email Address"!!!

post signature

Tuesday, 3 October 2006

Recent comments

Finally it is ready for use! I'm talking about recent comments. I have tried for ages with various hacks, but none ever quite worked for me. *sigh* But, now I have it, and I'm happy. Check it out!

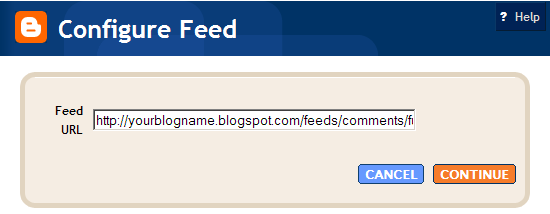
If you would like to display comments in your blog, first you must have Blogger Beta. Then go to page elements/add a page element/feed. Put this in the first box:
http://yourblogname.blogspot.com/feeds/comments/full
Make sure you replace yourblogname in the URL with your own, click continue. Then in the next window, you are able to select a few options. I named mine "Recent Chit-Chat", keep the comments to 5, and choose to have the comment author listed.

When it is done, move/drag it to the area on your sidebar you want to see it, and it is go to go!

Waiting for that first comment to show up...waiting...waiting....

post signature

Monday, 11 September 2006

Fixing the '1 comments' bug in Blogger Beta

Once again, Hans has dissected the Blogger Beta template and found a cure for the '1 Comments' bug. If it bothers you and you would really like to have it read '1 Comment', here is how to do it.
  1. Open the Blogger editor
  2. Go to 'Edit HTML'
  3. Expand Widgets Template
  4. Find:
    <b:if cond='data:post.allowComments'>
    <a class='comment-link' expr:href='data:post.addCommentUrl' expr:onclick='data:post.addCommentOnclick'>
    <b:if cond='data:post.numComments == 1'>1 <data:top.commentLabel/>
    <b:else/>
    <data:post.numComments/> <data:top.commentLabelPlural/>
    </b:if>
    </a>
    </b:if>
  5. Remove :<data:top.commentLabel/>
  6. Replace with: comment

Thanks (again) Hans!


post signature

Saturday, 12 August 2006

Keep track of Comments/Conversations with coComment

...see when people have added other comments to the discussion...

One of the perks of blogging is the easy interaction between the participants. Comments are the backbone of blogging. With the use of comments a blogger is able to get feedback, answer questions and get to know his/her readers on a more personal level. But, with all the blogs out there and all of the comments, it becomes quickly difficult to remember where you left a comment.

coComment to the rescue! I first found out about this from Blog-Blond. coComment was exactly what I've been looking for.

Previously I would comment on a post and think I would never forget where that blog was. Guess what? I did forget. Time and time again. But, those days are long gone. They couldn't of made it any easier. One less thing on my mind. I would highly recommend giving coComment a try. You won't be sorry.

post signature

Thursday, 22 June 2006

Correct comment count in blogger

My friend over at Beks and Ro, who is as picky as I am about her blog template, wanted to know how I got my comments to be 'correct'. Meaning if there are no comments it will say "0 comments" and if there is one comment it will say "1 comment" or if there are eight comments it will say "8 comments". Here is the code I inserted between the <Blogger> </Blogger> elements.
<MainOrArchivePage><BlogItemCommentsEnabled>
<a class="comment-link" href="<$BlogItemCommentCreate$>"
<$BlogItemCommentFormOnclick$>><script type="text/javascript">var a = <$BlogItemCommentCount$>;
if(a == 0) {document.write('No comment');}else if(a == 1){document.write('1 comment');}else {document.write(a+' comments');}</script></a>
</BlogItemCommentsEnabled><BlogItemBacklinksEnabled>
<a class="comment-link" href="<$BlogItemPermalinkUrl$>#links">links</a>
</BlogItemBacklinksEnabled></MainOrArchivePage>


post signature