Sunday 30 December 2007

Change the Post Title Font Easily


Hi Annie,

A possible tip for you:

To change my post title font I added a new variable called
posttitlefont at the top of my code. Then I modified the h3 section in
the Post wrapper in the CSS section. To my surprise Post Title Font
now shows up as an option under the fonts and colors tab in the
dashboard!

You can check it out at my blog, Upper Fort Stewart.

Ian Stewart


I received this tip from Ian almost a year ago. Life has a way of putting things on the back burner. This is a neat little edit for a blog post. Here is how it is done.

Open your Dashboard | Template | Edit HTML. Look for the /* Variable definitions section. Add this code to that section:
<Variable name="posttitlefont" description="Post Title Font" type="font" default="normal normal 78% 'Trebuchet MS', Trebuchet, Arial, Verdana, Sans-serif"></variable>
Next find the post header code in the CSS style sheet:
.post h3 {
margin:.25em 0 0;
padding:0 0 4px;
font-size:140%;
font-weight:normal;
line-height:1.4em;
color:$titlecolor;
}
Modify that code by replacing:
font-size:140%;
font-weight:normal;

with this:
font: $posttitlefont;

to make this code:
.post h3 {
margin:.25em 0 0;
padding:0 0 4px;
font: $posttitlefont;
line-height:1.4em;
color:$titlecolor;
}
Save your template. Once again go back to your Dashboard | Template | Fonts and Colors. There will be a new listing in the scroll box called Post Title Font. Now changes can be made to the post title with only a click!

post signature

Saturday 15 December 2007

The Scoop on OpenID and Blogger Comments

I have been looking into OpenId and it's connection with Blogger. I went straight to the source, thanks to Janeywan for sending me the link to OpenID Commenting on Blogger Buzz.

If you haven't set up OpenID, you can still link to your blog — or any webpage, for that matter — by using the standard tag inside the comment form.

From Blogger Buzz
First, what does OpenID do? It allows you to take your identity with you, proving that you own a particular URL. Isn't that simple? Yes. And a big surprise is that you may already have an OpenID. If not, don't fret. There are several options to get one:
  1. myOpenID which is what I used.
  2. claimID
  3. myvidoop
  4. myID.net
  5. VeriSign Labs
What does it mean to you, a blog owner? It means that readers can leave authenticated comments on your blog using their blog URLs from OpenID-enabled services such as WordPress.com, LiveJournal, and AOL Journals, or with their AOL/AIM accounts. When they leave a comment with an OpenID , you will see this icon OpenID icon next to their names. No more comment spoofing.

To enable this on your blog, go to your Dashboard | Settings | Comments | Who can Comment | check Anyone or Registered Users.

This is from myOpenID on using your own URL:

You can use your own URL as your OpenID, and still use myOpenID as your OpenID server. To set this up, create an account, and add the following markup into your page's <head<> section:
<link rel="openid.server"
href="http://www.myopenid.com/server" />
<link rel="openid.delegate"
href="http://youraccount.myopenid.com/" />
<link rel="openid2.local_id"
href="http://youraccount.myopenid.com" />
<link rel="openid2.provider"
href="http://www.myopenid.com/server" />
<meta http-equiv="X-XRDS-Location"
content="http://www.myopenid.com/xrds?username=youraccount.myopenid.com" />
Or another method...which I decided to use:
<link href='http://www.myopenid.com/server' rel='openid.server'/> <!-- For delegating OpenID v1.x-->
<link href='http://youraccount.myopenid.com' rel='openid.delegate'/> <!-- For delegating OpenID v1.x-->
<meta content='http://youraccount.myopenid.com/xrds' http-equiv='X-XRDS-Location'/> <!-- For delegating OpenID v2.x-->;
In both examples put your OpenID username where it says your account.

That's it. You can now use your own URL to log into OpenID enabled sites with myOpenID as your OpenID server.

Now, while I have your attention. Big Bad Blogger apologized for removing the URL field from the comments form prematurely. And they regreted making it appear that they were trying to force you into getting a Google Account. Don't you all feel bad for talking the way you did about them? Shame on you.

post signature

Friday 14 December 2007

The Blogger openID debate

There seems to be a huge rumbling about Blogger these days. A revolution of sorts. I'm not jumping on that band wagon. It concerns comment links and openID.

Let me step out on a limb here and say that I didn't start blogging to become the most popular kid on the block. I started blogging because I felt I had something to share with others. Nor do I comment only to have a link back to my blog. I comment because I have something to say. Either to let the poster know that I appreciate a well written post, or I have something that could be of interest to that poster and their readers. I didn't choose a blogging platform for it's ability to allow links in it's comment section.

With that being said, I do think linking is important. But not for the reason you may think. I like following links and placing links for the information shared within that link.

I will do what I always do with Blogger. Find a way. Just to make it simple for my readers, I have put this in the Comment Form Message in the comment setting section of the dashboard. Now my readers may comment and leave a link to something of interest. Or, if they wish, they can leave a link to their blog. Either way, it is there and easy to use.

I'm playing around with some of the fixes I've found, but at this point I'm not entirely clear on what I'm fixing! It all seems to work fine.

I really don't see what the fuss is about. Blogger will get it together and we will live happily ever after in Blogger Land.

post signature

Saturday 10 November 2007

New Comment Feature in Blogger

I've been so busy, but I wanted to point out to those of you that haven't noticed the new comment feature feature that recently appeared in Blogger.

After leaving a comment, you will see a new choice Email follow-up comments to. There you are able to choose to have any follow-up comments sent to you.


I love this feature, being a long time advocate of any means to tell readers when a comment is left. One of Blogger's better moves. Comments are the backbone of blogs. And email follow-up comments is calcium. (Is that goofy or what??)

post signature

Sunday 4 November 2007

Blogger xml Template - Goldfish

Goldfish Template
Click on image for working demo
Download
A note to those of you that put my templates up for download. I appreciate that you like them enough to do so, but please link back to my post and don't put my template for download from your site. I enjoy the traffic!

Introducing my first template for Blogger Beta! Featuring:
  1. Two sidebars
  2. A label cloud in the widebar
  3. Styled blockquotes
  4. Custom favicon

It was a fun template to design. Notice the rounded corners in the header and the white background? I became great friends with the GIMP making that! Layers, transparencies...it was a hoot. Such a learning experience.

EDIT: I probably need to mention that when you are looking at the Page Element in your Dashboard, you will notice it looks strange. Don't worry! Scroll down to the horizontal scroll bar and that will show you the whole picture. I don't know why it did this. But, it works wonderfully. Fixed!

Also, you can add your own text to the header if you follow the instructions in Tutorial: custom header for Blogger using GIMP .

If I think of anything else, I'll edit again.

UPDATES:
040908: 04/09/08: Added text file to copy and paste. You will still have to add the images as indicated in the instructions from the zip file. Go to the Dashboard | Layout | Edit HTML | Edit Template window. +/-Paste this text in that window:

<?xml version="1.0" encoding="UTF-8" ?>
<!DOCTYPE html PUBLIC "-//W3C//DTD XHTML 1.0 Strict//EN" "http://www.w3.org/TR/xhtml1/DTD/xhtml1-strict.dtd">
<html expr:dir='data:blog.languageDirection' xmlns='http://www.w3.org/1999/xhtml' xmlns:b='http://www.google.com/2005/gml/b' xmlns:data='http://www.google.com/2005/gml/data' xmlns:expr='http://www.google.com/2005/gml/expr'>
<head>

<link href='IMAGE/goldfishfav.png' rel='shortcut icon'/>
<link href='IMAGE/goldfishfav.png' rel='icon'/>

<b:include data='blog' name='all-head-content'/>
<title><data:blog.pageTitle/></title>
<b:skin><![CDATA[/*
-----------------------------------------------
Blogger Template Style
Name: Goldfish
Designer: anniebluesky
URL: www.bloggeruniversity.blogspot.com
Date: 11/04/2007
----------------------------------------------- */

/* Variable definitions
====================
<Variable name="bgcolor" description="Page Background Color"
type="color" default="#fff" value="#ffffff">
<Variable name="textcolor" description="Text Color"
type="color" default="#333" value="#4c4c4c">
<Variable name="linkcolor" description="Link Color"
type="color" default="#58a" value="#5588aa">
<Variable name="pagetitlecolor" description="Blog Title Color"
type="color" default="#666" value="#666666">
<Variable name="descriptioncolor" description="Blog Description Color"
type="color" default="#999" value="#999999">
<Variable name="titlecolor" description="Post Title Color"
type="color" default="#fff" value="#ffffff">
<Variable name="bordercolor" description="Border Color"
type="color" default="#174D97" value="#174D97">
<Variable name="sidebarcolor" description="Sidebar Title Color"
type="color" default="#174D97" value="#174D97">
<Variable name="sidebartextcolor" description="Sidebar Text Color"
type="color" default="#666" value="#666666">
<Variable name="visitedlinkcolor" description="Visited Link Color"
type="color" default="#999" value="#999999">
<Variable name="bodyfont" description="Text Font"
type="font" default="normal normal 100% Georgia, Serif" value="normal normal 95% Verdana, sans-serif">
<Variable name="headerfont" description="Sidebar Title Font"
type="font"
default="normal normal 78% 'Trebuchet MS',Trebuchet,Arial,Verdana,Sans-serif" value="normal normal 85% Trebuchet, Trebuchet MS, Arial, sans-serif">
<Variable name="pagetitlefont" description="Blog Title Font"
type="font"
default="normal normal 200% Georgia, Serif" value="normal normal 200% Verdana, sans-serif">
<Variable name="descriptionfont" description="Blog Description Font"
type="font"
default="normal normal 78% 'Trebuchet MS', Trebuchet, Arial, Verdana, Sans-serif" value="normal normal 78% 'Trebuchet MS', Trebuchet, Arial, Verdana, Sans-serif">
<Variable name="postfooterfont" description="Post Footer Font"
type="font"
default="normal normal 78% 'Trebuchet MS', Trebuchet, Arial, Verdana, Sans-serif" value="normal normal 78% 'Trebuchet MS', Trebuchet, Arial, Verdana, Sans-serif">
*/

/* Use this with templates/template-twocol.html */

body {
background:$bgcolor url(IMAGE/smbg.png);
margin:0;
color:$textcolor;
font:x-small Georgia Serif;
font-size/* */:/**/small;
font-size: /**/small;
text-align: center;
}
a:link {
color:$linkcolor;
text-decoration:none;
}
a:visited {
color:$visitedlinkcolor;
text-decoration:none;
}
a:hover {
color:#CD7710;
text-decoration:none;
}
a img {
border-width:0;
}

/* Header
----------------------------------------------- */

#header-wrapper {
background: url(IMAGE/goldfishheader.png) no-repeat top center;
width:912px;
height: 350px;
padding: 70px 0 0 35px;
}


#header-inner {
background-position: center;
margin-left: auto;
margin-right: auto;
}

#header {
margin: 5px;
text-align: center;
color:$pagetitlecolor;
}

#header h1 {
display: none;
}

#header a {
color:$pagetitlecolor;
text-decoration:none;
}

#header a:hover {
color:$pagetitlecolor;
}

#header .description {
margin:0 5px 5px;
padding:0 20px 15px;
max-width:700px;
text-transform:uppercase;
letter-spacing:.2em;
line-height: 1.4em;
font: $descriptionfont;
color: $descriptioncolor;
}

#header img {
margin-left: auto;
margin-right: auto;
}

/* Outer-Wrapper
----------------------------------------------- */
#outer-wrapper {
background: #ffffff url(IMAGE/contentbg.png) top center repeat-y;
width: 947px;
margin:10px auto;
text-align:left;
font: $bodyfont;
}

#content-wrapper {
margin: 0;
padding: 2px 10px;
clear:both;
}

#main-wrapper {
width: 440px;
float: left;
margin: 0 5px 10px 5px;
padding: 10px 10px 60px;
border-right: 1px solid #FBBA3C;
word-wrap: break-word; /* fix for long text breaking sidebar float in IE */
overflow: hidden; /* fix for long non-text content breaking IE sidebar float */
}
#main {
padding: 0 5px 15px 0px;
word-wrap: break-word; /* fix for long text breaking sidebar float in IE */
overflow: hidden; /* fix for long non-text content breaking IE sidebar float */
}

#right-sidebar-wrapper {
width: 200px;
padding: 10px;
padding-right: 20px;
margin: -.8em;
float: right;
word-wrap: break-word; /* fix for long text breaking sidebar float in IE */
overflow: hidden; /* fix for long non-text content breaking IE sidebar float */
}
#left-sidebar-wrapper {
width: 230px;
padding-left: 5px;
float: left;
word-wrap: break-word; /* fix for long text breaking sidebar float in IE */
overflow: hidden; /* fix for long non-text content breaking IE sidebar float */
}

/* Widebar
----------------------------------------------- */
#widebar-wrapper {
width: 444px;
float:right;
padding-right: 5px;
padding-left: 2px;
padding-bottom:10px;
word-wrap: break-word; /* fix for long text breaking sidebar float in IE */
overflow: hidden; /* fix for long non-text content breaking IE sidebar float */
}


/* Headings
----------------------------------------------- */

h2 {
margin:1.5em 0 .75em;
font:$headerfont;
line-height: 1.4em;
text-transform:uppercase;
letter-spacing:.2em;
color:$sidebarcolor;
}


/* Posts
-----------------------------------------------
*/
h2.date-header {
margin:0px;
}

.post {
margin:.5em 0 1.5em;
padding-bottom:1.5em;
}

.post h3 {
letter-spacing:.2em;
text-transform:uppercase;
padding: 4px 3px;
background-color: #FBBA3C;
font: normal normal 78% 'Trebuchet MS', Trebuchet, Arial, Verdana, Sans-serif;
font-size: 200%;
color: #ffffff;
}

.post h3 a, .post h3 a:visited, .post h3 strong {
display:block;
text-decoration:none;
color:$titlecolor;
font-weight:normal;
}

.post h3 strong, .post h3 a:hover {
color:$textcolor;
}

.post p {
margin:0 0 .75em;
line-height:1.6em;
}

.post-footer {
margin: .75em 0;
color:$sidebarcolor;
text-transform:uppercase;
letter-spacing:.1em;
font: $postfooterfont;
line-height: 1.4em;
}

.comment-link {
margin-left:.6em;
}

.post img {
padding:4px;
border:1px solid $bordercolor;
}

blockquote{
background-color: transparent;
border-top: 3px double #CD7710;
border-bottom: 3px double #CD7710;
padding: 5px;
font-style: oblique;
font-size: 1em;
margin-left: 5%;
margin-right: 5%;
}

/* Comments
----------------------------------------------- */
#comments h4 {
margin:1em 0;
font-weight: bold;
line-height: 1.4em;
text-transform:uppercase;
letter-spacing:.2em;
color: $sidebarcolor;
}

#comments-block {
margin:1em 0 1.5em;
line-height:1.6em;
}
#comments-block .comment-author {
margin:.5em 0;
}
#comments-block .comment-body {
margin:.25em 0 0;
}
#comments-block .comment-footer {
margin:-.25em 0 2em;
line-height: 1.4em;
text-transform:uppercase;
letter-spacing:.1em;
}
#comments-block .comment-body p {
margin:0 0 .75em;
}
.deleted-comment {
font-style:italic;
color:gray;
}

#blog-pager-newer-link {
float: left;
}

#blog-pager-older-link {
float: right;
}

#blog-pager {
text-align: center;
}

.feed-links {
clear: both;
line-height: 2.5em;
}

/* Sidebar Content
----------------------------------------------- */
.sidebar {
color: $sidebartextcolor;
line-height: 1.5em;
}

.sidebar h2 {
margin: 1.6em 0 .5em;
padding: 4px 8px;
background-color: #174D97;
font-size: 78%;
color: #ffffff;
}

.sidebar ul {
list-style:none;
margin:0 0 0;
padding:0 0 0;
}
.sidebar li {
margin:0;
padding:0 0 .25em 15px;
text-indent:-15px;
line-height:1.5em;
}

.sidebar .widget, .main .widget {
margin:0 0 1.5em;
padding:0 0 1.5em;
}


.main .Blog {
border-bottom-width: 0;
}


/* Profile
----------------------------------------------- */
.profile-img {
float: left;
margin: 0 5px 5px 0;
padding: 4px;
border: 1px solid $bordercolor;
}

.profile-data {
margin:0;
text-transform:uppercase;
letter-spacing:.1em;
font: $postfooterfont;
color: $sidebarcolor;
font-weight: bold;
line-height: 1.6em;
}

.profile-datablock {
margin:.5em 0 .5em;
}

.profile-textblock {
margin: 0.5em 0;
line-height: 1.6em;
}

.profile-link {
font: $postfooterfont;
text-transform: uppercase;
letter-spacing: .1em;
}

/* Footer
----------------------------------------------- */
#footer {
width:660px;
clear:both;
margin:0 auto;
padding-top:15px;
line-height: 1.6em;
text-transform:uppercase;
letter-spacing:.1em;
text-align: center;
}

p.credits {
font-family: sans-serif;
font-style: italic;
font-variant: normal;
font-weight: normal;
font-size: small;
line-height: 100%;
word-spacing: normal;
letter-spacing: 0.3ex;
text-decoration: none;
text-transform: none;
text-align: center;
text-indent: 0ex;
}

/** Page structure tweaks for layout editor wireframe */
body#layout #outer-wrapper {
width: 750px;
margin-left: auto;
margin-right: auto;
}
body#layout #header-wrapper {
margin-left: 0px;
margin-right: 0px;
width: 700px;
height: 279px;
}
body#layout #main-wrapper {
width: 400px;
padding: 30px 0 0 0;
}
body#layout #right-sidebar-wrapper {
width: 150px;
margin-right: 5px;
padding: 0 0 5px 0;
}
body#layout #left-sidebar-wrapper {
width: 150px;
padding: 0 0 5px 0;
}
body#layout #widebar-wrapper {
width: 300px;
padding: 0 0 5px 0;
}
body#layout #footer {
width:600px;
margin:0 auto;
padding-top:15px;
}

/* Label Cloud Styles
----------------------------------------------- */
#labelCloud {text-align:center;font-family:arial,sans-serif;}
#labelCloud .label-cloud li{display:inline;background-image:none !important;padding:0 5px;margin:0;vertical-align:baseline !important;border:0 !important;}
#labelCloud ul{list-style-type:none;margin:0 auto;padding:0;}
#labelCloud a img{border:0;display:inline;margin:0 0 0 3px;padding:0}
#labelCloud a{text-decoration:none}
#labelCloud a:hover{text-decoration:underline}
#labelCloud li a{}
#labelCloud .label-cloud {}
#labelCloud .label-count {padding-left:0.2em;font-size:9px;color:#000}
#labelCloud .label-cloud li:before{content:"" !important}

]]></b:skin>

<script type='text/javascript'>
// Label Cloud User Variables
var cloudMin = 1;
var maxFontSize = 20;
var maxColor = [205,119,16];
var minFontSize = 10;
var minColor = [23,77,151];
var lcShowCount = false;
</script>

</head>

<body>
<div id='outer-wrapper'><div id='wrap2'>

<!-- skip links for text browsers -->
<span id='skiplinks' style='display:none;'>
<a href='#main'>skip to main </a> |
<a href='#sidebar'>skip to sidebar</a>
</span>

<div id='header-wrapper'>
<b:section class='header' id='header' maxwidgets='1' showaddelement='no'>
<b:widget id='Header1' locked='true' title='Header Widget Sample (Header)' type='Header'>
<b:includable id='title'>
<b:if cond='data:blog.url == data:blog.homepageUrl'>
<data:title/>
<b:else/>
<a expr:href='data:blog.homepageUrl'><data:title/></a>
</b:if>
</b:includable>
<b:includable id='description'>
<div class='descriptionwrapper'>
<p class='description'><span><data:description/></span></p>
</div>
</b:includable>
<b:includable id='main'>

<b:if cond='data:useImage'>
<b:if cond='data:imagePlacement == &quot;REPLACE&quot;'>
<!--Show just the image, no text-->
<div id='header-inner'>
<a expr:href='data:blog.homepageUrl' style='display: block'>
<img expr:alt='data:title' expr:height='data:height' expr:id='data:widget.instanceId + &quot;_headerimg&quot;' expr:src='data:sourceUrl' expr:width='data:width' style='display: block'/>
</a>
</div>
<b:else/>
<!--Show image as background to text-->
<div expr:style='&quot;background-image: url(\&quot;&quot; + data:sourceUrl + &quot;\&quot;); &quot; + &quot;background-repeat: no-repeat; &quot; + &quot;width: &quot; + data:width + &quot;px; &quot; + &quot;height: &quot; + data:height + &quot;px;&quot;' id='header-inner'>
<div class='titlewrapper' style='background: transparent'>
<h1 class='title' style='background: transparent; border-width: 0px'>
<b:if cond='data:blog.url == data:blog.homepageUrl'>
<data:title/>
<b:else/>
<a expr:href='data:blog.homepageUrl'><data:title/></a>
</b:if>
</h1>
</div>
<div class='descriptionwrapper'>
<p class='description'><span><data:description/></span></p>
</div>
</div>
</b:if>
<b:else/>
<!--No header image -->
<div id='header-inner'>
<div class='titlewrapper'>
<h1 class='title'>
<b:if cond='data:blog.url == data:blog.homepageUrl'>
<data:title/>
<b:else/>
<a expr:href='data:blog.homepageUrl'><data:title/></a>
</b:if>
</h1>
</div>
<div class='descriptionwrapper'>
<p class='description'><span><data:description/></span></p>
</div>
</div>
</b:if>
</b:includable>
</b:widget>
</b:section>
</div>

<div id='content-wrapper'>

<div id='crosscol-wrapper' style='text-align:center'>
<b:section class='crosscol' id='crosscol' showaddelement='no'/>
</div>


<div id='main-wrapper'>
<b:section class='main' id='main' showaddelement='no'>
<b:widget id='Blog1' locked='true' title='Blog Posts' type='Blog'>
<b:includable id='nextprev'>
<div class='blog-pager' id='blog-pager'>
<b:if cond='data:newerPageUrl'>
<span id='blog-pager-newer-link'>
<a class='blog-pager-newer-link' expr:href='data:newerPageUrl' expr:id='data:widget.instanceId + &quot;_blog-pager-newer-link&quot;' expr:title='data:newerPageTitle'><data:newerPageTitle/></a>
</span>
</b:if>

<b:if cond='data:olderPageUrl'>
<span id='blog-pager-older-link'>
<a class='blog-pager-older-link' expr:href='data:olderPageUrl' expr:id='data:widget.instanceId + &quot;_blog-pager-older-link&quot;' expr:title='data:olderPageTitle'><data:olderPageTitle/></a>
</span>
</b:if>

<b:if cond='data:blog.homepageUrl != data:blog.url'>
<a class='home-link' expr:href='data:blog.homepageUrl'><data:homeMsg/></a>
<b:else/>
<b:if cond='data:newerPageUrl'>
<a class='home-link' expr:href='data:blog.homepageUrl'><data:homeMsg/></a>
</b:if>
</b:if>

</div>
<div class='clear'/>
</b:includable>
<b:includable id='backlinks' var='post'>
<a name='links'/><h4><data:post.backlinksLabel/></h4>
<b:if cond='data:post.numBacklinks != 0'>
<dl class='comments-block' id='comments-block'>
<b:loop values='data:post.backlinks' var='backlink'>
<div class='collapsed-backlink backlink-control'>
<dt class='comment-title'>
<span class='backlink-toggle-zippy'>&#160;</span>
<a expr:href='data:backlink.url' rel='nofollow'><data:backlink.title/></a>
<b:include data='backlink' name='backlinkDeleteIcon'/>
</dt>
<dd class='comment-body collapseable'>
<data:backlink.snippet/>
</dd>
<dd class='comment-footer collapseable'>
<span class='comment-author'><data:post.authorLabel/> <data:backlink.author/></span>
<span class='comment-timestamp'><data:post.timestampLabel/> <data:backlink.timestamp/></span>
</dd>
</div>
</b:loop>
</dl>
</b:if>
<p class='comment-footer'>
<a class='comment-link' expr:href='data:post.createLinkUrl' expr:id='data:widget.instanceId + &quot;_backlinks-create-link&quot;' target='_blank'><data:post.createLinkLabel/></a>
</p>
</b:includable>
<b:includable id='post' var='post'>
<div class='post hentry uncustomized-post-template'>
<a expr:name='data:post.id'/>
<b:if cond='data:post.title'>
<h3 class='post-title entry-title'>
<b:if cond='data:post.link'>
<a expr:href='data:post.link'><data:post.title/></a>
<b:else/>
<b:if cond='data:post.url'>
<a expr:href='data:post.url'><data:post.title/></a>
<b:else/>
<data:post.title/>
</b:if>
</b:if>
</h3>
</b:if>

<div class='post-header-line-1'/>

<div class='post-body entry-content'>
<p><data:post.body/></p>
<div style='clear: both;'/> <!-- clear for photos floats -->
</div>
<div class='post-footer'>
<p class='post-footer-line post-footer-line-1'>
<span class='post-author vcard'>
<b:if cond='data:top.showAuthor'>
<data:top.authorLabel/>
<span class='fn'><data:post.author/></span>
</b:if>
</span>

<span class='post-timestamp'>
<b:if cond='data:top.showTimestamp'>
<data:top.timestampLabel/>
<b:if cond='data:post.url'>
<a class='timestamp-link' expr:href='data:post.url' rel='bookmark' title='permanent link'><abbr class='published' expr:title='data:post.timestampISO8601'><data:post.timestamp/></abbr></a>
</b:if>
</b:if>
</span>

<span class='post-comment-link'>
<b:if cond='data:blog.pageType != &quot;item&quot;'>

<b:if cond='data:post.allowComments'>
<a class='comment-link' expr:href='data:post.addCommentUrl' expr:onclick='data:post.addCommentOnclick'><b:if cond='data:post.numComments == 1'>1 <data:top.commentLabel/><b:else/><data:post.numComments/> <data:top.commentLabelPlural/></b:if></a>
</b:if>
</b:if>
</span>

<!-- backlinks -->
<span class='post-backlinks post-comment-link'>
<b:if cond='data:blog.pageType != &quot;item&quot;'>
<b:if cond='data:post.showBacklinks'>
<a class='comment-link' expr:href='data:post.url + &quot;#links&quot;'><data:top.backlinkLabel/></a>
</b:if>
</b:if>
</span>

<span class='post-icons'>
<!-- email post links -->
<b:if cond='data:post.emailPostUrl'>
<span class='item-action'>
<a expr:href='data:post.emailPostUrl' expr:title='data:top.emailPostMsg'>
<span class='email-post-icon'>&#160;</span>
</a>
</span>
</b:if>

<!-- quickedit pencil -->
<b:include data='post' name='postQuickEdit'/>
</span>
</p>

<p class='post-footer-line post-footer-line-2'>
<span class='post-labels'>
<b:if cond='data:post.labels'>
<data:postLabelsLabel/>
<b:loop values='data:post.labels' var='label'>
<a expr:href='data:label.url' rel='tag'><data:label.name/></a><b:if cond='data:label.isLast != &quot;true&quot;'>,</b:if>
</b:loop>
</b:if>
</span>
</p>

<p class='post-footer-line post-footer-line-3'/>
</div>
</div>
</b:includable>
<b:includable id='commentDeleteIcon' var='comment'>
<span expr:class='&quot;item-control &quot; + data:comment.adminClass'>
<a expr:href='data:comment.deleteUrl' expr:title='data:top.deleteCommentMsg'>
<span class='delete-comment-icon'>&#160;</span>
</a>
</span>
</b:includable>
<b:includable id='status-message'>
<b:if cond='data:navMessage'>
<div class='status-msg-wrap'>
<div class='status-msg-body'>
<data:navMessage/>
</div>
<div class='status-msg-border'>
<div class='status-msg-bg'>
<div class='status-msg-hidden'><data:navMessage/></div>
</div>
</div>
</div>
<div style='clear: both;'/>
</b:if>
</b:includable>
<b:includable id='feedLinks'>
<b:if cond='data:blog.pageType != &quot;item&quot;'> <!-- Blog feed links -->
<b:if cond='data:feedLinks'>
<div class='blog-feeds'>
<b:include data='feedLinks' name='feedLinksBody'/>
</div>
</b:if>

<b:else/> <!--Post feed links -->
<div class='post-feeds'>
<b:loop values='data:posts' var='post'>
<b:if cond='data:post.allowComments'>
<b:if cond='data:post.feedLinks'>
<b:include data='post.feedLinks' name='feedLinksBody'/>
</b:if>
</b:if>
</b:loop>
</div>
</b:if>
</b:includable>
<b:includable id='backlinkDeleteIcon' var='backlink'>
<span expr:class='&quot;item-control &quot; + data:backlink.adminClass'>
<a expr:href='data:backlink.deleteUrl' expr:title='data:top.deleteBacklinkMsg'>
<span class='delete-comment-icon'>&#160;</span>
</a>
</span>
</b:includable>
<b:includable id='feedLinksBody' var='links'>
<div class='feed-links'>
<data:feedLinksMsg/>
<b:loop values='data:links' var='f'>
<a class='feed-link' expr:href='data:f.url' expr:type='data:f.mimeType' target='_blank'><data:f.name/> (<data:f.feedType/>)</a>
</b:loop>
</div>
</b:includable>
<b:includable id='postQuickEdit' var='post'>
<b:if cond='data:post.editUrl'>
<span expr:class='&quot;item-control &quot; + data:post.adminClass'>
<a expr:href='data:post.editUrl' expr:title='data:top.editPostMsg'>
<span class='quick-edit-icon'>&#160;</span>
</a>
</span>
</b:if>
</b:includable>
<b:includable id='comments' var='post'>
<div class='comments' id='comments'>
<a name='comments'/>
<b:if cond='data:post.allowComments'>
<h4>
<b:if cond='data:post.numComments == 1'>
1 <data:commentLabel/>:
<b:else/>
<data:post.numComments/> <data:commentLabelPlural/>:
</b:if>
</h4>

<dl id='comments-block'>
<b:loop values='data:post.comments' var='comment'>
<dt class='comment-author' expr:id='data:comment.anchorName'>
<a expr:name='data:comment.anchorName'/>
<b:if cond='data:comment.authorUrl'>
<a expr:href='data:comment.authorUrl' rel='nofollow'><data:comment.author/></a>
<b:else/>
<data:comment.author/>
</b:if>
<data:commentPostedByMsg/>
</dt>
<dd class='comment-body'>
<b:if cond='data:comment.isDeleted'>
<span class='deleted-comment'><data:comment.body/></span>
<b:else/>
<p><data:comment.body/></p>
</b:if>
</dd>
<dd class='comment-footer'>
<span class='comment-timestamp'>
<a expr:href='data:comment.url' title='comment permalink'>
<data:comment.timestamp/>
</a>
<b:include data='comment' name='commentDeleteIcon'/>
</span>
</dd>
</b:loop>
</dl>

<p class='comment-footer'>
<a expr:href='data:post.addCommentUrl' expr:onclick='data:post.addCommentOnclick'><data:postCommentMsg/></a>
</p>
</b:if>

<div id='backlinks-container'>
<div expr:id='data:widget.instanceId + &quot;_backlinks-container&quot;'>
<b:if cond='data:post.showBacklinks'>
<b:include data='post' name='backlinks'/>
</b:if>
</div>
</div>
</div>
</b:includable>
<b:includable id='main' var='top'>
<!-- posts -->
<div class='blog-posts hfeed'>

<b:include data='top' name='status-message'/>

<data:adStart/>
<b:loop values='data:posts' var='post'>
<b:if cond='data:post.dateHeader'>
<h2 class='date-header'><data:post.dateHeader/></h2>
</b:if>
<b:include data='post' name='post'/>
<b:if cond='data:blog.pageType == &quot;item&quot;'>
<b:include data='post' name='comments'/>
</b:if>
<b:if cond='data:post.includeAd'>
<data:adEnd/>
<data:adCode/>
<data:adStart/>
</b:if>
</b:loop>
<data:adEnd/>
</div>

<!-- navigation -->
<b:include name='nextprev'/>

<!-- feed links -->
<b:include name='feedLinks'/>
</b:includable>
</b:widget>
</b:section>
</div>

<div id='widebar-wrapper'>
<b:section class='sidebar' id='widebar' preferred='yes'>
<b:widget id='Label1' locked='false' title='Label Cloud' type='Label'>
<b:includable id='main'>
<b:if cond='data:title'>
<h2><data:title/></h2>
</b:if>

<div class='widget-content'>
<div id='labelCloud'/>
<script type='text/javascript'>

// Don&#39;t change anything past this point -----------------
// Cloud function s() ripped from del.icio.us
function s(a,b,i,x){
if(a&gt;b){
var m=(a-b)/Math.log(x),v=a-Math.floor(Math.log(i)*m)
}
else{
var m=(b-a)/Math.log(x),v=Math.floor(Math.log(i)*m+a)
}
return v
}


var c=[];
var labelCount = new Array();
var ts = new Object;
<b:loop values='data:labels' var='label'>
var theName = &quot;<data:label.name/>&quot;;
ts[theName] = <data:label.count/>;
</b:loop>

for (t in ts){
if (!labelCount[ts[t]]){
labelCount[ts[t]] = new Array(ts[t])
}
}
var ta=cloudMin-1;
tz = labelCount.length - cloudMin;
lc2 = document.getElementById(&#39;labelCloud&#39;);
ul = document.createElement(&#39;ul&#39;);
ul.className = &#39;label-cloud&#39;;
for(var t in ts){
if(ts[t] &lt; cloudMin){
continue;
}
for (var i=0;3 &gt; i;i++) {
c[i]=s(minColor[i],maxColor[i],ts[t]-ta,tz)
}
var fs = s(minFontSize,maxFontSize,ts[t]-ta,tz);
li = document.createElement(&#39;li&#39;);
li.style.fontSize = fs+&#39;px&#39;;
li.style.lineHeight = &#39;1&#39;;
a = document.createElement(&#39;a&#39;);
a.title = ts[t]+&#39; Posts in &#39;+t;
a.style.color = &#39;rgb(&#39;+c[0]+&#39;,&#39;+c[1]+&#39;,&#39;+c[2]+&#39;)&#39;;
a.href = &#39;/search/label/&#39;+encodeURIComponent(t);
if (lcShowCount){
span = document.createElement(&#39;span&#39;);
span.innerHTML = &#39;(&#39;+ts[t]+&#39;) &#39;;
span.className = &#39;label-count&#39;;
a.appendChild(document.createTextNode(t));
li.appendChild(a);
li.appendChild(span);
}
else {
a.appendChild(document.createTextNode(t));
li.appendChild(a);
}
ul.appendChild(li);
abnk = document.createTextNode(&#39; &#39;);
ul.appendChild(abnk);
}
lc2.appendChild(ul);
</script>

<noscript>
<ul>
<b:loop values='data:labels' var='label'>
<li>
<b:if cond='data:blog.url == data:label.url'>
<data:label.name/>
<b:else/>
<a expr:href='data:label.url'><data:label.name/></a>
</b:if>
(<data:label.count/>)
</li>
</b:loop>
</ul>
</noscript>
<b:include name='quickedit'/>
</div>

</b:includable>
</b:widget>
</b:section></div>


<div id='right-sidebar-wrapper'>
<b:section class='sidebar' id='right-sidebar' preferred='yes'>
<b:widget id='BlogArchive1' locked='false' title='Blog Archive' type='BlogArchive'>
<b:includable id='toggle' var='interval'>
<b:if cond='data:interval.toggleId'>
<b:if cond='data:interval.expclass == &quot;expanded&quot;'>
<a class='toggle' expr:href='data:widget.actionUrl + &quot;&amp;action=toggle&quot; + &quot;&amp;dir=close&amp;toggle=&quot; + data:interval.toggleId + &quot;&amp;toggleopen=&quot; + data:toggleopen'>
<span class='zippy toggle-open'>&#9660; </span>
</a>
<b:else/>
<a class='toggle' expr:href='data:widget.actionUrl + &quot;&amp;action=toggle&quot; + &quot;&amp;dir=open&amp;toggle=&quot; + data:interval.toggleId + &quot;&amp;toggleopen=&quot; + data:toggleopen'>
<span class='zippy'>&#9658; </span>
</a>
</b:if>
</b:if>
</b:includable>
<b:includable id='interval' var='intervalData'>
<b:loop values='data:intervalData' var='i'>
<ul>
<li expr:class='&quot;archivedate &quot; + data:i.expclass'>
<b:include data='i' name='toggle'/>
<a class='post-count-link' expr:href='data:i.url'><data:i.name/></a>
(<span class='post-count'><data:i.post-count/></span>)
<b:if cond='data:i.data'>
<b:include data='i.data' name='interval'/>
</b:if>
<b:if cond='data:i.posts'>
<b:include data='i.posts' name='posts'/>
</b:if>
</li>
</ul>
</b:loop>
</b:includable>
<b:includable id='menu' var='data'>
<select expr:id='data:widget.instanceId + &quot;_ArchiveMenu&quot;'>
<option value=''><data:title/></option>
<b:loop values='data:data' var='i'>
<option expr:value='data:i.url'><data:i.name/> (<data:i.post-count/>)</option>
</b:loop>
</select>
</b:includable>
<b:includable id='flat' var='data'>
<ul>
<b:loop values='data:data' var='i'>
<li class='archivedate'>
<a expr:href='data:i.url'><data:i.name/></a> (<data:i.post-count/>)
</li>
</b:loop>
</ul>
</b:includable>
<b:includable id='posts' var='posts'>
<ul class='posts'>
<b:loop values='data:posts' var='i'>
<li><a expr:href='data:i.url'><data:i.title/></a></li>
</b:loop>
</ul>
</b:includable>
<b:includable id='main'>
<b:if cond='data:title'>
<h2><data:title/></h2>
</b:if>
<div class='widget-content'>
<div id='ArchiveList'>
<div expr:id='data:widget.instanceId + &quot;_ArchiveList&quot;'>
<b:if cond='data:style == &quot;HIERARCHY&quot;'>
<b:include data='data' name='interval'/>
</b:if>
<b:if cond='data:style == &quot;FLAT&quot;'>
<b:include data='data' name='flat'/>
</b:if>
<b:if cond='data:style == &quot;MENU&quot;'>
<b:include data='data' name='menu'/>
</b:if>
</div>
</div>
<b:include name='quickedit'/>
</div>
</b:includable>
</b:widget>
<b:widget id='BloggerButton1' locked='false' title='' type='BloggerButton'>
<b:includable id='main'>
<div class='widget-content'>
<a href='http://www.blogger.com'><img alt='Powered By Blogger' expr:src='data:fullButton'/></a>
<b:include name='quickedit'/>
</div>
</b:includable>
</b:widget>
</b:section>
</div>

<div id='left-sidebar-wrapper'>
<b:section class='sidebar' id='left-sidebar' preferred='yes'>
<b:widget id='Text1' locked='false' title='Stuff' type='Text'>
<b:includable id='main'>
<!-- only display title if it's non-empty -->
<b:if cond='data:title != &quot;&quot;'>
<h2 class='title'><data:title/></h2>
</b:if>
<div class='widget-content'>
<data:content/>
</div>

<b:include name='quickedit'/>
</b:includable>
</b:widget>
<b:widget id='Profile1' locked='false' title='About Me' type='Profile'>
<b:includable id='main'>
<b:if cond='data:title != &quot;&quot;'>
<h2><data:title/></h2>
</b:if>
<div class='widget-content'>
<b:if cond='data:team == &quot;true&quot;'> <!-- team blog profile -->
<ul>
<b:loop values='data:authors' var='i'>
<li><a expr:href='data:i.userUrl'><data:i.display-name/></a></li>
</b:loop>
</ul>

<b:else/> <!-- normal blog profile -->

<b:if cond='data:photo.url != &quot;&quot;'>
<a expr:href='data:userUrl'><img class='profile-img' expr:alt='data:photo.alt' expr:height='data:photo.height' expr:src='data:photo.url' expr:width='data:photo.width'/></a>
</b:if>

<dl class='profile-datablock'>
<dt class='profile-data'><data:displayname/></dt>

<b:if cond='data:showlocation == &quot;true&quot;'>
<dd class='profile-data'><data:location/></dd>
</b:if>

<b:if cond='data:aboutme != &quot;&quot;'><dd class='profile-textblock'><data:aboutme/></dd></b:if>
</dl>
<a class='profile-link' expr:href='data:userUrl'><data:viewProfileMsg/></a>
</b:if>

<b:include name='quickedit'/>
</div>
</b:includable>
</b:widget>
</b:section>
</div>

<!-- spacer for skins that want sidebar and main to be the same height-->
<div class='clear'>&#160;</div>

</div> <!-- end content-wrapper -->

<div id='footer-wrapper'>
<b:section class='footer' id='footer'/>
</div>

</div></div> <!-- end outer-wrapper -->

<!-- FOOTER -->

<!--Please do not remove the credit links below, thank you.-->
<p class='credits'><span style='color : #FFFFFF;'>
designer : anniebluesky : </span>
<a href='http://bloggeruniversity.blogspot.com/'>
<span style='color : #FFFFFF;'>www.bloggeruniversity.blogspot.com</span></a></p>
<p class='credits'><span style='color : #FFFFFF;'>
graphics : VLADSTUDIO : </span>
<a href='http://www.vladstudio.com/home/'>
<span style='color : #FFFFFF;'>www.vladstudio.com</span></a></p><br/>
<!--END FOOTER -->

</body>
</html>


And remember...

Need help? It is just a click away!


post signature

Friday 2 November 2007

Custom Blogger Help - Blog Aid!!

aidIt has taken me a very long time to come to this conclusion. Not everyone likes, or even wants to delve into the depths of their blog template. I know...it is true!! It is hard for me to wrap my mind around that. How could you not love it when all the little code falls into place?

Oh well. Based on that theory, I'm going to offer my services. This is for those of you that don't desire to, don't have the time to, or would rather take a beating than work on your blog template.

Here is what I offer:
  1. $20 - fix blog problem
  2. $60 - set up blog (see below*)
  3. $75 - custom template design and set up
  4. $30 - custom header
*When I set up a template it can happen one of two ways:
  1. You have a template that you like. For a starting point, look in my sidebar:
    1. Templates I designed under +/- Templates by annie
    2. Templates from other sites under +/- Templates.
  2. You tell me what you have in mind, and in this case a few links to blogs that you like really helps, and I find a suitable template and install it.
Here are a few examples of templates I have designed for clients. You can click on the image for the working test blog:


Email inquiries to blogger.university@gmail.com


post signature

Sunday 28 October 2007

A New Footer Section

After deciding to stay with this template, I wanted to spruce it up a bit. One thing I hate is the speed of loading. My solution? I added a new Footer section, which I named the cellar. I got the idea from Amanda over at Blogger Buster. Then I added a twist or two of my own.

First, let me explain why this is a solution. I know what the slow loaders are on my blog. My blogrolls are horribly slow. As are my Amazon widgets, and Blogger Play. I'm not sure if Feedjit is or not, but I put it in the cellar anyway.

I have my blog arranged so the posts load first, then the sidebars, and my cellar loads last. So, unless you are a speed reader, by the time you reach the cellar, it is fully loaded. No waiting. No fuss. No muss.

My cellar is defined by a horizontal line with text across the top and a horizontal line across the bottom. This is how it appears on the Page Elements page.


Not only does it contain the 3 column area, it contains a full width column before and after the last horizontal line!

As always, it is a good idea to save your template before starting.

Now, add this code to the CSS sheet between <b:skin><![CDATA[/* and ]]></b:skin>:
#footer-column-container {
clear:both;
}
.footer-column {
padding: 10px;
}
.footer-bottom {
padding: 10px;
}
Next find this code:
<div id='footer-wrapper'>
<b:section class='footer' id='footer'/>
</div>
Replace <b:section class='footer' id='footer'/> with this code:
<div id='footer-column-container'>

<div style='clear:both;'/>

<p>
<center><b>{ <i>YOUR TEXT</i> }</b></center>
<hr align='center' color='#cccccc' width='90%'/>
</p>

<div id='footer2' style='width: 33%; float: left; margin:0; text-align: left;'>
<b:section class='footer-column' id='col1' preferred='yes' style='float:left;'>
<b:widget id='HTML1' locked='false' title='' type='HTML'/>
</b:section>
</div>

<div id='footer3' style='width: 33%; float: left; margin:0; text-align: left;'>
<b:section class='footer-column' id='col2' preferred='yes' style='float:left;'>
<b:widget id='HTML2' locked='false' title='' type='HTML'/>
</b:section>
</div>

<div id='footer4' style='width: 33%; float: right; margin:0; text-align: left;'>
<b:section class='footer-column' id='col3' preferred='yes' style='float:right;'>
<b:widget id='HTML3' locked='false' title='' type='HTML'/>
</b:section>
</div>

<div style='clear:both;'/>

<div id='footer-bottom' style='text-align: center; padding: 10px; text-transform: lowercase;'>
<b:section class='footer' id='col-top' preferred='yes'>
<b:widget id='HTML4' locked='false' title='' type='HTML'/>
</b:section>
</div>

<p>
<hr align='center' color='#cccccc' width='90%'/></p>
<div id='footer-bottom' style='text-align: center; padding: 10px; text-transform: lowercase;'>

<b:section class='footer' id='col-bottom' preferred='yes'>
<b:widget id='HTML5' locked='false' title='' type='HTML'/>
</b:section>
</div>

<div style='clear:both;'/>
</div>
You can name your footer here or remove this code if you don't want text. You can also change the color of the horizontal line.

Save your template. Depending on your blog, you may have to change some of the widgets from HTML1 to a different name...like HTML 15. Just depends upon what type of widgets you have in your blog. Remember you can always delete the widget and put in a different type later. This is just to get the code in place.

Now you have widgets out of the wazoo!!! I love widgets!!!!!!!

UPDATE:
04/09/08: Error fixed! Thanks for pointing out a problem, Gelo!!!
post signature

Add "Subscribe to Comments (Atom)"

In each Blogger template, below the posts, is a link that allows readers to subscribe to your posts Atom feed. Remember when I wanted to put this feature back in my template, but couldn't figure out how? Well, I finally found out how to restore the Subscribe to Comments (Atom) feature.

Here is what you need to do if you have *ahem* misplaced yours like I did. Open your Dashboard | Template | Edit HTML and check Expand Widgets Templates. Find this code:
<!--Post feed links -->
<div class="post-feeds">
<b:loop values="data:posts" var="post">
<b:if cond="data:post.allowComments">
<b:if cond="data:post.feedLinks">
<b:include data="post.feedLinks" name="feedLinksBody">
</b:include>
</b:if>
</b:if>
PUT NEW CODE HERE
</b:loop></div>
Replace PUT NEW CODE HERE with:
<a href="http://yourblogname.blogspot.com/feeds/comments/TYPE">Subscribe to: Post Comments (Atom)</a>
Put your blog's name in, and change TYPE to full or summary.

post signature

Poll is closed and the verdict is...

Today the poll for my blog template is finished. The results?
  • Original: 66%
  • Pink: 33%
Thanks to everyone that voted. If the truth be told, I'm glad that I'm keeping the original. I put a lot of time and effort into this template...testing, trying out, tweaking, arranging, posting about all of it.

It was fun thinking about a new one and dabbling in a different code, but it feels good to be home.

post signature

Wednesday 24 October 2007

Change "Post A Comment On:" Text


Hi, I've been reading your blog for a few weeks now and I've gone way back into your archive. It's been a huge help for me. Thank you! I am writing however because I can't figure out how to edit the "Post A Comment On:" page. See this link for my specific example.

I've been creating a wedding website based on Blogger and have only allowed comments on the Guestbook "page" of my site and I've changed all references to "comments" to read "entries" or "guestbook entries" or "sign my guestbook". The only exception is this page which I can't quite figure out how to modify. Do you have anysugestions. The wedding site is: www.florandbrian.com
Thanks,
Brian


Brian, first you must open your dashboard | Template | Edit HTML and check Expand Widget Templates. Search until you find this code in the template:
<p class='comment-footer'>
<a expr:href='data:post.addCommentUrl' expr:onclick='data:post.addCommentOnclick'><data:postCommentMsg/></a>
</p>
Change the code in red to the code in green:
<p class='comment-footer'>
<a expr:href='data:post.addCommentUrl' expr:onclick='data:post.addCommentOnclick'>Sign my Guestbook</a>
</p>
That should do it! And congratulations to you and Flor!!

post signature

Sunday 21 October 2007

Vote for a template

I thought it might be time to do a new look for BlogU. And pink makes me happy. I found this awesome pink template and I've been adding widgets to it and tweaking it here and there. There is so work much to be done in it, if that is the way I decide to go.

I'm asking my readers to vote in the poll to let me know if I should stay with the original BlogU or use the new Pink BlogU.

Please vote, while keeping in mind that many items will be changed (like widget colors etc) on Pink BlogU if I make the switch.

The other reason for changing templates is I can spread out the items that make BlogU slow in loading. I think that would be a great improvement! Pink BlogU loads much faster.

So, vote and let me know!!

post signature

Wednesday 17 October 2007

Link Tooltip


i wonder how you make the text thingy appear when you mouse over a link (text or image) then the text thing appears - like when i mouse over buttermilk cloud the text "my new blog" appears under the hand icon in a square box.

That is a tool-tip that displays when you move your cursor over the link. It is created with a simple little change to the link code.
<a href="http://buttermilkclouds.blogspot.com/" title="My Food Blog">Buttermilk Clouds</a>
That code will make this link: Buttermilk Clouds. Just change the URL, title text (where I have My Food Blog) and what is displayed.

Go ahead, test it by hovering the cursor over the link!

post signature

Locating the CSS style sheet


and i again i am able to do something with my blog with your very easy to use instructions. it took me a while before i can get it going as i didnt know where the CSS style sheet began. thank you so much! my blog is still in the works so no links yet. again, thank you. ;>

It seems the CSS style sheet is an elusive piece of code for some of you. Here is how to find it.
  • Classic Blogger: Between the <style> and </style> tags. The first tag could have more in it like <style type="text/css" media="screen"> so don't let that concern you.
  • Beta Blogger: Between the <b:skin><![CDATA[/* and ]]></b:skin>
The first tag is towards the beginning of your template in Classic and Beta Blogger. The style sheet it's self contains a lot of code that looks like this:
.sidebar {
color: $sidebartextcolor;
line-height: 1.5em;
}

and

#header a {
color:$pagetitlecolor;
text-decoration:none;
}
Note the "{ }" and the "#". They will be all over the place. That is a tale-tell sign of the CSS style sheet code.

post signature

Tuesday 16 October 2007

Blogger Play


In mid September blogger launched a new toy...Blogger Play. It shows the pictures that are being uploaded to blogger in real time. A never ending stream of images. Addictive.

You are able to add this wonderful little toy to your sidebar. You can see mine in my sidebar now!

Add Blogger Play to your blog


Play with the borders and title until you get exactly what you like. Then open your Dashboard | Template | Page Elements | Add a Page Element | HTML/JavaScript and paste the code in the window.

Simple as that. Prepare to become addicted.

post signature

Sunday 7 October 2007

FEEDJIT

I just found a new widget that I thought I'd share with you.(I love widgets!!!) FEEDJIT gives you real-time traffic data on your blog or website.

Get a live arrival and departure traffic report
FEEDJIT

No registration is required and it's completely free. You are able to see at a glance where your visitors are located in the world, which websites they're arriving from and what they're clicking when they leave your site.

I absolutely love seeing where you all come from! So, this widget is right up my alley. (Translation for my foreign visitors...this widget is one I really like.)

post signature

Friday 21 September 2007

PictoBrowser

Are you looking for a way to add large sets of pictures to your blog? Something classy? Slick? I have just the thing for you. It is called PictroBrowser. Here is an example of what it can do.


If you hoover your cursor over a thumbnail, the name of the photo is displayed. Click on a thumbnail, and it is displayed in upper window. Notice the little number 1 and 2 on the bottom? That tells you that there are 2 rows of photos, and if you click on 2 the next row of thumbnails is displayed.

So, how do you get this wonderful gadget?
  1. You need a flickr account with some pictures uploaded.
  2. After you get your pictures on flickr, arrange the photos you want to eventually display in the PictoBrowser window by set, tag or group.
  3. Now click on the Info tab in the bottom right of my PictroBrowser.
  4. In the next window that opens type YOUR FLICKR USERNAME in the box.
  5. Click Submit.
  6. Now select the Set, Tag or Group you want to display.
  7. From the next list, pick the name you assigned to the photo Set, Tag, or Group.
  8. The very next window to pop up tells you that Your PictoBrowser is ready! Copy and paste the code in the large box and paste it in a post or in a widget for your sidebar.
TaDa!! Oh, by the way...I took those pictures!

post signature

Monday 10 September 2007

Comment Feed Tutorial

Now that I have completed RSS in simple terms, which explains the basics of RSS, and Setting up a RSS Feed, which explains how to open a feed for posts, I can dig a little deeper. For me, setting up a comment feed was extremely difficult. I don't know exactly why that is. Maybe because ages ago I removed some code from my template that had to do with comment feeds, or I just couldn't figure out where or what my comment feed was. I worked entirely too long on this problem. Some things are not meant to come easy to me, but when they do I wonder what took so long for the light to come on. As you can see, the light did come on, and I have a shiny new comment feed in my sidebar. I'm positive there are other ways to do this. But this is the only way I know, so let me explain it so no one else has to go through the darkness like I did.

I'm assuming you have read Setting up a RSS Feed, and it is humming along. Setting up a comment feed is a process, but once set up, it is an automatic thing of beauty. The process involves:
  1. MailBucket
  2. FeedBurner
  3. of course, Blogger
  4. Gmail
1. MailBucket. This is a service that provides an email-to-RSS gateway. What does this mean? In simple terms and more importantly - all that I need to know - is that it gives me a comment feed URL. To get this little snippet of magic code, go to the MailBucket site and read a bit about the service. Then in the address bar, type http://mailbucket.org/YOURNAME.xml. You will want to change YOURNAME to something relevant to your blog for ease of remembering. (And you will want this name for Step 4.) Then hit enter.
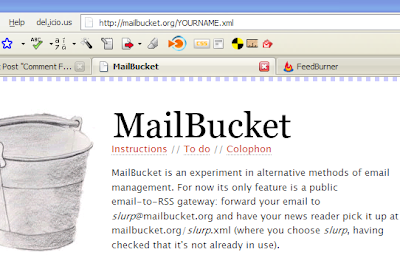

A little miracle occurs and your reader pops up! See the link ending in xml? Copy that. You will need it for your next step.
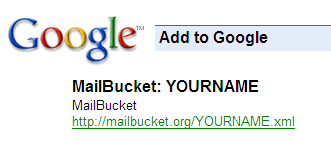


2. FeedBurner. Go to FeedBurner and sign in. Follow the steps in the previous post, Setting up a RSS Feed.


3. Blogger. When finished add the code to your blog...open Dashboard | Template | Page Elements | Add a Page Element | HTML/JavaScript. Paste that code in the window.

Now open Dashboard | Settings | Comments | Comment Notification Address. In this window paste your Gmail address. Remember to Save!

4. Gmail. Last stop. Open your Gmail account. We're going to work with filters. At the top of the window is a link that says Create a filter. You'll want to click on that.


Next you'll see several boxes at top. We will only use the Subject area. Type in [YOUR BLOG NAME] New comment in that box. Then click Next Step>>.


The next page you will check the Forward it to: box and then paste your MailBucket email address, which is YOURNAME@mailbucket.org. (Refer to Step 1 for the name you used with MailBucket.) Click on Create Filter.
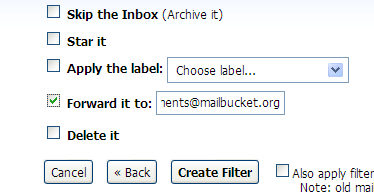


Now you are done. whew Yes, it is true. Get a glass of wine and set back to wait for a comment to roll in. Or pay your friends and family to leave a comment. Or comment yourself. (Which is what I did while testing...I'm impatient and cheap.) Somehow, don't ask me how, through the miracle of the internet, comments get forwarded to email and forwarded to MailBucket and sent to a feed. Then, if your readers are smart, they will subscribe to your comment feed and anytime someone leaves a comment (or in my case, I leave an answer to an important blogging question) they will see it in their reader!!!

post signature

Sunday 9 September 2007

Setting up a RSS Feed

As promised, I'm going to show you how to equip your blog with your very own RSS feed. My experience is with FeedBurner. There are others, but like I said, I have experience with FeedBurner.

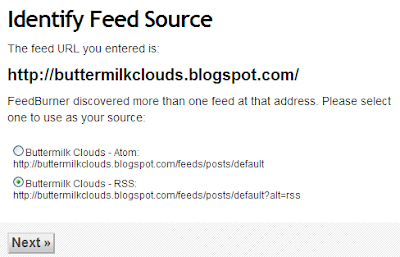
First things first. If you haven't registered yet, jump right in. After you register, you will be asked to "Burn a feed right this instant." Translated, it means put the URL of your blog in the box, and click next.


Since a website URL was typed in, FeedBurner looks for your feed. Sometimes you have two. In this case I selected the RSS option, then click next.


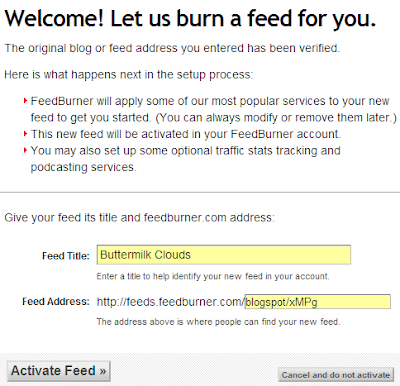
The next page gives you a chance to change the title of your feed, and shows you your feed address. If you are happy, click activate.


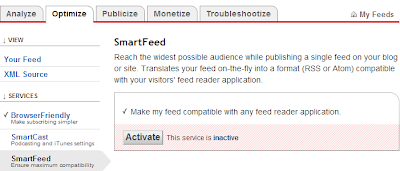
The next screen is the congrats stuff. I just click on Skip directly to feed management. That takes you to a screen with several tabs across the top of the page. Click on the Optimize tab. You will see a row of options in the left sidebar. Click SmartFeed and activate that service. This makes your feed compatible with all readers.

Before you go any further, look around. Click all the tabs and run down the left sidebar. There are many ways to customize your feed. When you are happy with what you have you are ready to Publicize your feed.

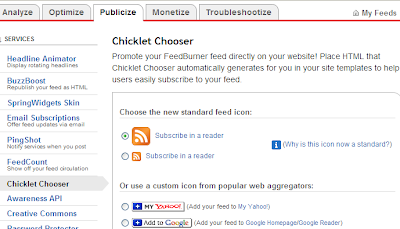
Select the Publicize tab and click Chicklet Chooser in the sidebar. This is where you choose the icon you want displayed and any additional readers you want displayed. (Remember, you don't have to show all the readers, the feed will automatically translate your feed into a format that can be used by your visitors' feed reader application.)


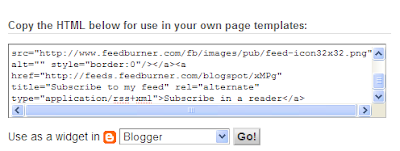
Scroll down the the bottom of the page and select Blogger. Copy this code. It is what you will paste in your sidebar widget.


To put it in your blog, open Dashboard | Template | Page Elements | Add a Page Element | HTML/JavaScript. Paste that code in the window. Save and you have a shiny new feed for your blog!!

Oh, by the way, if you want to use your own RSS feed icon, that is easily done. Do you see the png file in the above image? Upload your image to your webhost (I use RipWay) and then replace http://www.feedburner.com/fb/images/pub/feed=icon32x32.png with your own image location.

post signature

Saturday 8 September 2007

RSS in simple terms

I feel that RSS is a sweet mystery of the universe. Or at least of the wide world web. I'm going to break it down in easy to understand terms for everyone that ever wondered "What is RSS?" or "Do I need RSS?"

To begin with what does the RSS stand for? According to Wikipedia, it means Really Simple Syndication. So, my question is, why does it seem not so simple? I've done some investigating, and as it turns out, it is simple!!

Here is the breakdown. We all have favorite blogs and websites that we read. But, as time goes on, the list gets longer and longer. How do you keep up with the newest posts on your favorite sites? Do you click individually on each site everyday? That could really be time consuming, so you check occasionally. Not a real efficient method.

RSS steps up to save the day...efficiency at it's best. With RSS, you can subscribe to your favorite blogs and websites and when that site is updated, a headline or summary is sent to your reader. (More about readers in a moment.) How do you subscribe? It is as simple as a click away. Most blogs and websites make it very easy for you to subscribe to their RSS feed by having the icon in a prominent place on their site. You will see a little orange icon that is the standard symbol for RSS. Occasionally the symbol will be a different color or configured different. But, if you look carefully, you will recognize it. To subscribe to that blog, just click on the RSS icon. Then, when that blog has a new post or that website has new content, you will be notified via your reader.

In the RSS world there are two players. The feed and the reader. The feed concerns the owner of the blog or website, and they configure their feed for their site. (A future post on setting up a feed is in the process...subscribe to my RSS feed to find out when!) The reader is what you will need to receive their feed. It is your mailbox for your subscriptions. Here is a list to get you started:
  1. Google Reader (which is what I use)
  2. Bloglines
  3. Pageflakes
  4. MyYahoo
After you get a reader, check it daily and you will see the updates of your favorite sites. This is much easier than running all over the internet checking for new content. Since I use Google Reader, it is displayed on my homepage, iGoogle, every time I get on the computer. Nothing could be easier.

post signature