Let's get started! Open GIMP. This is what you will see.

You will notice all the icons at the top of the program. These are your tools. The brush is already indented. For the purpose of this tutorial, we are going to leave the brush choices alone, but if you care to change the brush size, texture or color, that is done in the lower half of the program. Change color by clicking on the black square that is over the white square and choose a color. Below that are a couple of areas that change the Mode (texture, design) of the stroke and Brush (brush style).
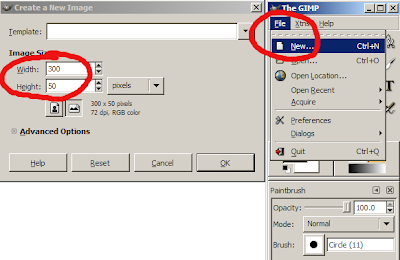
But, let's get back to making the sig. At the top click on File/ New and a 'Create a New Image' box opens. Here you can either select a template size or put your own in the 'Width/ Height' windows. I put in 300 x 50 for this tutorial. Click on 'OK' and that window closes and a new pallet opens called 'Untitled'. Not original, but it works!

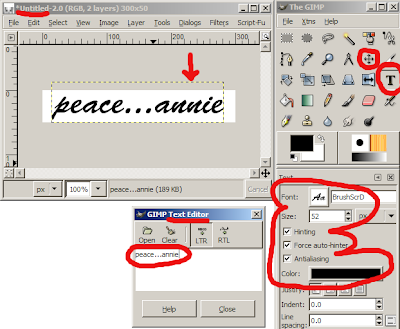
Back to the top of the program. (see the next illustration)
- Click on the T which opens up the 'Text Editor'
- Choose your font, color and size in the lower part of the program (the big fat red E)
- Put your cursor in the 'Text Editor' box and type your text. As you type you will see the text forming in the 'Untitled' box. You may have to adjust your size at this point. (look in the big red E)
- Another adjustment you will probably have to do is move the text around in the 'Untitled' box. To do this, in the upper part of the program (close to the T) click on the crossed arrows icon. The portion you move (called a layer) is within the orange and black dashed line.
- Put your cursor in the 'Untitled' box. It will do a number of strange things here. But, when you see it turn into an arrow and a diamond with 4 tiny squares, you can move that layer. If you mess up, just click on Edit/ Undo Move Layer in the 'Untitled' box. Try again.
 Now all that is left to do is save your creation! You'll want to choose a file extension (I like png). It will probably say that "PNG can't handle layers"...click Export and next box OK. Believe me...it will be OK. Here is the one I made for this tutorial.
If you look at this post, Blogger Beta - Post Signature , it shows you how to put your signature in every new post!
No comments:
Post a Comment