Friday, 21 September 2007

PictoBrowser

Are you looking for a way to add large sets of pictures to your blog? Something classy? Slick? I have just the thing for you. It is called PictroBrowser. Here is an example of what it can do.


If you hoover your cursor over a thumbnail, the name of the photo is displayed. Click on a thumbnail, and it is displayed in upper window. Notice the little number 1 and 2 on the bottom? That tells you that there are 2 rows of photos, and if you click on 2 the next row of thumbnails is displayed.

So, how do you get this wonderful gadget?
  1. You need a flickr account with some pictures uploaded.
  2. After you get your pictures on flickr, arrange the photos you want to eventually display in the PictoBrowser window by set, tag or group.
  3. Now click on the Info tab in the bottom right of my PictroBrowser.
  4. In the next window that opens type YOUR FLICKR USERNAME in the box.
  5. Click Submit.
  6. Now select the Set, Tag or Group you want to display.
  7. From the next list, pick the name you assigned to the photo Set, Tag, or Group.
  8. The very next window to pop up tells you that Your PictoBrowser is ready! Copy and paste the code in the large box and paste it in a post or in a widget for your sidebar.
TaDa!! Oh, by the way...I took those pictures!

post signature

Monday, 10 September 2007

Comment Feed Tutorial

Now that I have completed RSS in simple terms, which explains the basics of RSS, and Setting up a RSS Feed, which explains how to open a feed for posts, I can dig a little deeper. For me, setting up a comment feed was extremely difficult. I don't know exactly why that is. Maybe because ages ago I removed some code from my template that had to do with comment feeds, or I just couldn't figure out where or what my comment feed was. I worked entirely too long on this problem. Some things are not meant to come easy to me, but when they do I wonder what took so long for the light to come on. As you can see, the light did come on, and I have a shiny new comment feed in my sidebar. I'm positive there are other ways to do this. But this is the only way I know, so let me explain it so no one else has to go through the darkness like I did.

I'm assuming you have read Setting up a RSS Feed, and it is humming along. Setting up a comment feed is a process, but once set up, it is an automatic thing of beauty. The process involves:
  1. MailBucket
  2. FeedBurner
  3. of course, Blogger
  4. Gmail
1. MailBucket. This is a service that provides an email-to-RSS gateway. What does this mean? In simple terms and more importantly - all that I need to know - is that it gives me a comment feed URL. To get this little snippet of magic code, go to the MailBucket site and read a bit about the service. Then in the address bar, type http://mailbucket.org/YOURNAME.xml. You will want to change YOURNAME to something relevant to your blog for ease of remembering. (And you will want this name for Step 4.) Then hit enter.
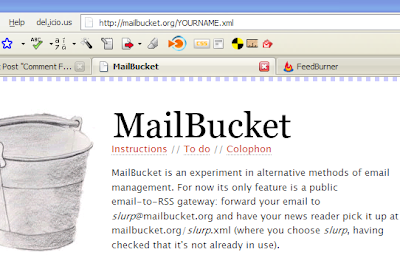

A little miracle occurs and your reader pops up! See the link ending in xml? Copy that. You will need it for your next step.
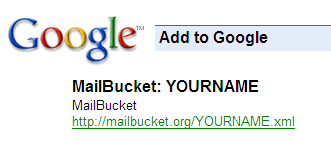


2. FeedBurner. Go to FeedBurner and sign in. Follow the steps in the previous post, Setting up a RSS Feed.


3. Blogger. When finished add the code to your blog...open Dashboard | Template | Page Elements | Add a Page Element | HTML/JavaScript. Paste that code in the window.

Now open Dashboard | Settings | Comments | Comment Notification Address. In this window paste your Gmail address. Remember to Save!

4. Gmail. Last stop. Open your Gmail account. We're going to work with filters. At the top of the window is a link that says Create a filter. You'll want to click on that.


Next you'll see several boxes at top. We will only use the Subject area. Type in [YOUR BLOG NAME] New comment in that box. Then click Next Step>>.


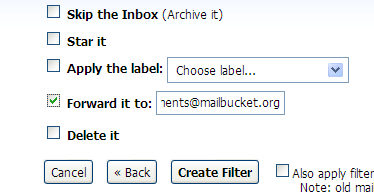
The next page you will check the Forward it to: box and then paste your MailBucket email address, which is YOURNAME@mailbucket.org. (Refer to Step 1 for the name you used with MailBucket.) Click on Create Filter.


Now you are done. whew Yes, it is true. Get a glass of wine and set back to wait for a comment to roll in. Or pay your friends and family to leave a comment. Or comment yourself. (Which is what I did while testing...I'm impatient and cheap.) Somehow, don't ask me how, through the miracle of the internet, comments get forwarded to email and forwarded to MailBucket and sent to a feed. Then, if your readers are smart, they will subscribe to your comment feed and anytime someone leaves a comment (or in my case, I leave an answer to an important blogging question) they will see it in their reader!!!

post signature

Sunday, 9 September 2007

Setting up a RSS Feed

As promised, I'm going to show you how to equip your blog with your very own RSS feed. My experience is with FeedBurner. There are others, but like I said, I have experience with FeedBurner.

First things first. If you haven't registered yet, jump right in. After you register, you will be asked to "Burn a feed right this instant." Translated, it means put the URL of your blog in the box, and click next.


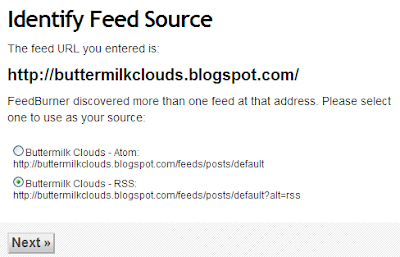
Since a website URL was typed in, FeedBurner looks for your feed. Sometimes you have two. In this case I selected the RSS option, then click next.


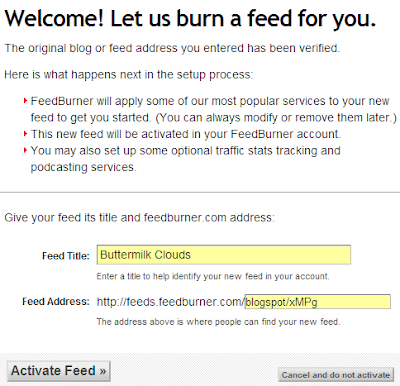
The next page gives you a chance to change the title of your feed, and shows you your feed address. If you are happy, click activate.


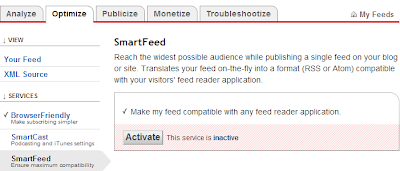
The next screen is the congrats stuff. I just click on Skip directly to feed management. That takes you to a screen with several tabs across the top of the page. Click on the Optimize tab. You will see a row of options in the left sidebar. Click SmartFeed and activate that service. This makes your feed compatible with all readers.

Before you go any further, look around. Click all the tabs and run down the left sidebar. There are many ways to customize your feed. When you are happy with what you have you are ready to Publicize your feed.

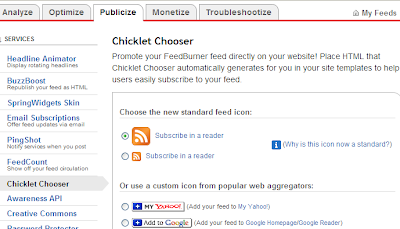
Select the Publicize tab and click Chicklet Chooser in the sidebar. This is where you choose the icon you want displayed and any additional readers you want displayed. (Remember, you don't have to show all the readers, the feed will automatically translate your feed into a format that can be used by your visitors' feed reader application.)


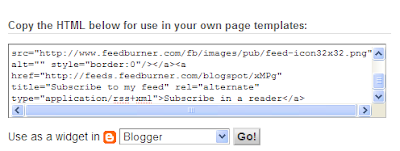
Scroll down the the bottom of the page and select Blogger. Copy this code. It is what you will paste in your sidebar widget.


To put it in your blog, open Dashboard | Template | Page Elements | Add a Page Element | HTML/JavaScript. Paste that code in the window. Save and you have a shiny new feed for your blog!!

Oh, by the way, if you want to use your own RSS feed icon, that is easily done. Do you see the png file in the above image? Upload your image to your webhost (I use RipWay) and then replace http://www.feedburner.com/fb/images/pub/feed=icon32x32.png with your own image location.

post signature

Saturday, 8 September 2007

RSS in simple terms

I feel that RSS is a sweet mystery of the universe. Or at least of the wide world web. I'm going to break it down in easy to understand terms for everyone that ever wondered "What is RSS?" or "Do I need RSS?"

To begin with what does the RSS stand for? According to Wikipedia, it means Really Simple Syndication. So, my question is, why does it seem not so simple? I've done some investigating, and as it turns out, it is simple!!

Here is the breakdown. We all have favorite blogs and websites that we read. But, as time goes on, the list gets longer and longer. How do you keep up with the newest posts on your favorite sites? Do you click individually on each site everyday? That could really be time consuming, so you check occasionally. Not a real efficient method.

RSS steps up to save the day...efficiency at it's best. With RSS, you can subscribe to your favorite blogs and websites and when that site is updated, a headline or summary is sent to your reader. (More about readers in a moment.) How do you subscribe? It is as simple as a click away. Most blogs and websites make it very easy for you to subscribe to their RSS feed by having the icon in a prominent place on their site. You will see a little orange icon that is the standard symbol for RSS. Occasionally the symbol will be a different color or configured different. But, if you look carefully, you will recognize it. To subscribe to that blog, just click on the RSS icon. Then, when that blog has a new post or that website has new content, you will be notified via your reader.

In the RSS world there are two players. The feed and the reader. The feed concerns the owner of the blog or website, and they configure their feed for their site. (A future post on setting up a feed is in the process...subscribe to my RSS feed to find out when!) The reader is what you will need to receive their feed. It is your mailbox for your subscriptions. Here is a list to get you started:
  1. Google Reader (which is what I use)
  2. Bloglines
  3. Pageflakes
  4. MyYahoo
After you get a reader, check it daily and you will see the updates of your favorite sites. This is much easier than running all over the internet checking for new content. Since I use Google Reader, it is displayed on my homepage, iGoogle, every time I get on the computer. Nothing could be easier.

post signature

Wednesday, 5 September 2007

Peek-A-Boo Posts from Labels (from my inbox)

I feel a little guilty trying to take you up on an offer of help you made so long ago, but it seems like Ramani has not answered questions about this in a while and I thought perhaps you would have a sense of what's going on. I really would like to get this hack operational on my blog, but I cannot make it work. I keep getting a message about b:includable elements not being permitted in widget 1. I've checked and rechecked and re-re-checked that I'm putting everything in the correct place. Any other thoughts about what might be wrong here?
Thanks very much,
Emilie


Emilie, I think Ramani probably is busy with his new baby. If I remember right, they had a baby not long ago. So, I took a look at Ramani's post and tried it in a practice blog. I got the same message as you. I played with it a bit and was able to make it work. With only one change. I will outline the steps here.

Open your Dashboard | Template | Edit HTML | and check Expand Widget Templates. After the <head> tag place the following code:

<script type='text/javascript'>
function toggleIt(id) {
post = document.getElementById(id);
if (post.style.display != 'none') {
post.style.display = 'none';
} else {
post.style.display = '';
}
}
</script>
That was the change I made from Ramani's code. I don't understand it so much, but it works. The rest is the same. You can read the rest on Hackosphere or expand this post for the second part of the instructions.

+/-

Your widgets are expanded from the instructions above. Now look for blog-posts and add the code in red.
<b:includable id='PeekABooPost' var='post'>
<div class='post uncustomized-post-template'>
<table><tr>
<td width='40px'>
<a href='javascript:void(0)' title='Expand/collapse this post' style='text-decoration:none' expr:onclick='"javascript:toggleIt(\"" + data:post.id + "\");"'>[+/-]</a>
</td>
<td>
<h3 class='post-title'><a expr:href='data:post.url'><data:post.title/></a></h3>
</td>
</tr></table>
<div class='post-body' expr:id='data:post.id' style='display:none'>
<p><data:post.body/></p>
<div style='clear: both;'/> <!-- clear for photos floats -->
</div>
</div>
</b:includable>


<b:includable id='main' var='top'>
<!-- posts -->
<div id='blog-posts'>
<b:loop values='data:posts' var='post'>
<b:if cond='data:post.dateHeader'>
<h2 class='date-header'><data:post.dateHeader/></h2>
</b:if>

<b:if cond='data:blog.homepageUrl != data:blog.url'>
<b:if cond='data:blog.pageType != "item"'>
<b:include data='post' name='PeekABooPost'/>
<b:else/>
<b:include data='post' name='post'/>
</b:if>
<b:else/>

<b:include data='post' name='post'/>

</b:if>

<b:if cond='data:blog.pageType == "item"'>
<b:if cond='data:post.allowComments'>
<b:include data='post' name='comments'/>
</b:if>
</b:if>
</b:loop>
</div>

post signature